Quantcast
Channel: SQLBackupAndFTP's blog
Viewing all 198 articles
Browse latest View live

Top 2014 News of Database – the fall of Microsoft Azure SQL Prices

$
0
0

Microsoft has not ceased in its bid to attract more and more enterprise customers onto their Azure cloud computing system, with all their databases in tow of course. This came shortly after the company disclosed to the public a preview of Azure’s enhanced security auditing feature. With the fall, the company announced its intention to change its cloud-based computing and database offering to make it more affordable.

According to Eron Kelly, who is the general manager in charge of Microsoft SQL server product marketing, the company intended to reduce its service tier prices. In addition, he revealed in a statement made public in the fall the company intended to introduce a new level of performance and offer billing on hourly basis.

According to the company, enterprises would see savings of as much as 50% compared to the previously published rates for the Standard and Premium Azure SQL plan after the trimming is complete.

Better performance for less

That was hardly the best database news, according to Mr. Kelly. With the new pricing structure, which came into effect on November 1st, customers could upgrade to plans with better performance at an affordable rate. This would give them the benefit of greater business continuity as well as higher performance.

According to the new plan, the Standard Service Azure tier got a new S0 (S-zero) tier, in addition to the S1 and S2 performance tier levels which were priced at $30 and $75 respectively for support. Kelly explained that the introduction of the new tier aimed to be a gateway for more customers to be able to benefit from the Azure SQL Standard package.

Interested customers now have a wide range of service packages to select from – from the Standard S0 plan that starts at a monthly fee of $15 to the highest performance P3 Premium package that costs $3,720 monthly.

Hourly billing system

The new service tiers from Microsoft Azure SQL became available in September this year, four months after the Basic, Standard and Premium package previews first opened to the public.

Kelly explained that the new service tiers would now enjoy an hourly billing system, rather than the daily and monthly pricing schemes previously used on all plans. This, just like the new S0 plan intended to help businesses match their cloud consumption needs with the resources they wished to allocate to the same.

Customers now enjoy flexibility that was not there before; seamlessly shifting between performance levels and service tiers according to their performance requirements and demand patterns. The result is a level of cost-effectiveness not previously possible, coupled with reliable performance.

To top off the new and improved plans and enhancements, the service level agreement also received a boost for the new service tiers. Kelly explained that more and more customers were moving workloads critical to sound business operations to the cloud, meaning that high availability was a major concern. He explained that the company bumped up SLA for Microsoft Azure SQL from 99.95% to 99.99% uptime.

The sky is the limit, they say, with the company revealing that it had even more improvements up its sleeve come the New Year.

Bio: Above article has been contributed by Jenny Richards. She is currently working at http://bigdropinc.com/ as web developer. She handles all the database and connectivity related issues.

The post Top 2014 News of Database – the fall of Microsoft Azure SQL Prices appeared first on SQL Backup and FTP.


Giveaway: TSQL String Functions Cheat Sheet

How to backup multiple servers

$
0
0
sqlbackupaandftp
This article is an easy step by step tutorial and it will explain how to easily backup multiple servers and the databases that you want, while using SQLBackupAndFTP.
 

Backup multiple servers

In order to backup multiple servers with SQLBackup all you have to do is create a new job for each server that you want to backup databases from. Thus if you want to backup 3 servers, you will have to create 3 jobs.

Below we will try to exemplify what are the generic steps you should take to backup multiple servers with SQLBackupAndFTP.

  • You start SQLBackupAndFTP and create a New Job by pressing the New button (as displayed below).

backup multiple servers

    • After creating this new job you must first connect to the database server (SQL Server Instance) in order to have access to the databases which are going to be backed up.

backup multiple servers

    • A smaller window will appear where you will have to select the Server Name you want to connect to, from the drop-down list. Input the required User name and Password in order to connect to the server instance.

 backup multiple servers

    • If the connection was succesful the name of the database server should appear above the “Connect to SQL Server” button.

backup multiple servers

    • The list of databases available on this server will be displayed as is displayed below and you can select which one you want to back up.

backup multiple servers

Also, do not forget that the process is not yet complete without selecting an appropriate Backup Location, setting a Schedule for this Backup plan and other best practices which we recommend and which you can find in these articles.

After completing all of the details of your job, press Save and we recommend to test the job by pressing Run Now. If the job runs successfully and if the backup file is created correctly then everything is finished.

All you have to do now is to press the “New Job” button and restart the process from the second step and continue this workflow until you have created backup jobs for each of the servers you want to back up.

If you have any questions or problems please feel free to post a comment on this article or visit our Forum.

The post How to backup multiple servers appeared first on SQL Backup and FTP.

How to backup to UNC Path

$
0
0
backup to unc pathIt’s important to have flexibility and not sacrifice security when backing up your databases. For this reason, some DBAs will prefer to backup to UNC paths on their local network.
This will keep the backups in a closed environment with access only to those users inside the network which are authorized.
In this article we will show you how to backup to UNC paths in the simplest way possible, by using SQLBackupAndFTP, instead of using complex and confusing T-SQL and complex maintenance plans.

Backup to UNC Path

If you want to regularly take a backup to UNC Paths in your network of your databases, you can do this through a maintenance plan which is set up along with a schedule or we can use SQLBackupAndFTP.

But in order to set up a backup plan you need access to a SSMS environment or you’d have to write your own T-SQL Scripts to make a schedule and a task, which can be very painful.

The easier alternative would be to use SQLBackupAndFTP and we’ll show you how.

We start off by opening SQLBackupAndFTP and reviewing the main screen. We can see multiple options for setting up our schedule and the databases as well as being able to set up a backup destination, which is where we will make the setup to backup to UNC Path.

backup to unc path

Pressing the “Add backup destination” button will open up a smaller window, similar to the one in the image below. In order to backup to UNC Paths, you would have to selec the first option, “Local/Network Folder”.

backup to unc path

By selecting this option, we will be taken to another screen where you are able to set the location (folder) where the backup file will be created.

backup to unc path

Additional details will be required to be added in the User name and Password fields if access to the folder requires authentication.

In order to make sure that the access and settings are correct, you can press the Test button.

backup to unc path

After adding the backup destination folder, all you have to do in order to finish the setup for your backup schedule is to set the actual details of the schedule: the time you want it to run, the frequency (hourly, daily, weekly etc.) as well as other settings to add another degree of security that your backups are created correctly and that your data is safe.

More details on how to set up a schedule you can find in another article, here.

The post How to backup to UNC Path appeared first on SQL Backup and FTP.

SQL Server backup report

$
0
0
backup reportSometimes it helps to have simple access to detailed information about your latest backups.
This is why a backup report always comes in handy when you need to know when was the last time your database or a specific database was backed up and what was the last type of backup that was taken.
In order to help you with this we’ve composed a small script which you can easily run to find out important information.

Backup report

Below you can find a simple script which you can run in any SSMS environment in order to have access to a simple backup report, yet one which gives you a clear view about your backup schedule’s activity.

SELECT 
    Bk1.server_name AS [Server_Name]
   	, Bk1.database_name AS [Database_Name]
   	, MAX(Bk1.backup_finish_date)AS [Last_Backup]
        , MAX(CASE 
                 WHEN Bk1.type ='D'
                    THEN Bk1.backup_finish_date 	
                 ELSE NULL 
              END) AS [Last_Full_Backup]
   	, MAX(CASE
                 WHEN Bk1.type ='I'
                    THEN Bk1.backup_finish_date
                 ELSE NULL 
              END) AS [Last_Diff_Backup]
   	, MAX(CASE
                 WHEN Bk1.type ='L'
                    THEN Bk1.backup_finish_date
                 ELSE NULL 
              END) AS [Last_Log_Backup]
   	, Bk2.NAME AS [Backup_Set]
   	, DATEDIFF(d,(max(Bk1.backup_finish_Date)),GETDATE()) AS [Days_Since_Last_Backup]
FROM msdb.dbo.backupset AS Bk1
INNER JOIN msdb.dbo.backupset AS Bk2 ON Bk1.backup_set_id = Bk2.backup_set_id
GROUP BY Bk1.database_name
    	, Bk1.server_name
    , Bk2.name
ORDER BY database_name

Running this script in SSMS will yield a result for the backup report similar to the one in the image below, where you will be able to see the name of the database that was backed up, from what database server it belongs to, when was the last time it was backed up and when where the last times FULL, Differential or Transaction Log backups were made.

backup report


We consider that this is the most useful information that a DBA might need at any given moment regarding his backups and his data.

If you have suggestions or alternatives for this query, please post a comment below and we will take into consideration your thoughts and possibly alter the query accordingly.

The post SQL Server backup report appeared first on SQL Backup and FTP.

How to exclude databases from a backup job in SQLBackupAndFTP

$
0
0

SQLBackupAndFTP has an option to backup all non-system databases. This is useful as it would automatically add all the new databases added after the backup job was created.SBF - backup all non-system dbs
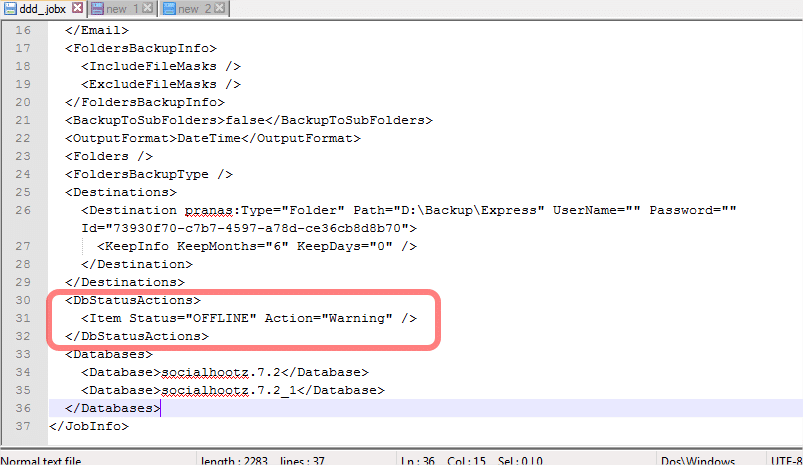
However when using this option you may want to exclude some databases from your backup jobs. In other words you may want to backup everything except a few databases.

This is not a very common request and we have decided not to add to SQLBackupAndFTP any UI controls to create the excluded database list for the time being. But you can still make it work by modifying your .jobx file directly. Please note that you need at least version 10.0.32 for this to work.

Here’s how to do it:

Create a job with “Backup all non-system DBs” option selected and save it. Open the .jobx file with notepad and add the lines as in the example below. In this example we exclude MediaValues and MediaValues-NEW databases from the backup job:

<ExcludeDatabases>
 <Database>MediaValues</Database>
<Database>MediaValues-NEW</Database>
</ExcludeDatabases>

Your *.jobx file will look like this:Jobx - Exclude databases Then when you open the .jobx file with SQLBackupAndFTP, these databases will not included into your backup job.SBF - backup all non-system dbs - result

The post How to exclude databases from a backup job in SQLBackupAndFTP appeared first on SQL Backup and FTP.

How to skip databases in Offline state in SQLBackupAndFTP

$
0
0

If you have database in the OFFLINE state and these databases are scheduled to be backed up, their backup will fail and the whole backup job will be shown as Failed. Same when you use Database Mirroring, you may have databases in Restoring state and they can’t be backed up either.  If you have such databases included in your backup job, you may want to skip them if they are in Offline or Restore state and show the whole job as Success, not Failure.

While we do not have the interface to exclude databases in a certain state from the backup job, it is easy to do it by editing the .jobx file directly. Just open .jobx file with a notepad and add the strings like below to show a Warning instead of the Failure (default) for any of the databases in the OFFLINE state:

<DbStatusActions>
<Item Status=”OFFLINE” Action=”Warning” />
</DbStatusActions>

Your .jobx file will look like this:SBF - DbStatusActions

In this example SQLBackupAndFTP will skip backup of this database with a Warning message.
The  supported statuses are: OFFLINE, RESTORING, RECOVERING, RECOVERY PENDING, SUSPECT, EMERGENCY.
The supported actions are : Warning, Backup, Error.

Please note, this feature works in SQLBackupAndFTP starting with version 10.0.31.

The post How to skip databases in Offline state in SQLBackupAndFTP appeared first on SQL Backup and FTP.

How to use CHECKSUM and VERIFYONLY in SQLBackupAndFTP

$
0
0

For any SQL Server DBA who’s been in the field for a long time, you know that the exercise of restoring backups taken in SQL Server 2000 (and even SQL Server 2005 without using the CHECKSUM option) was many times a sweat-filled lottery. You usually gambled and/ or prayed to your respective deity that your backups would actually work. Why? Because you knew that restore failures were all too common, despite SQL Server’s assurance that all was well because you had already verified your backups with the VERIFYONLY option. So why was this the case? Why did restore operations fail so frequently? Let’s delve a bit more into the innards of the VERIFYONLY and CHECKSUM options to find out.

RESTORE VERIFYONLY & CHECKSUM

First some background information: The VERIFYONLY option is the next best thing to actually restoring your backup file, in order to confirm that it is actually usable. When you execute

RESTORE VERIFYONLY FROM <BACKUP DEVICE> = ‘filename’

SQL Server confirms that the file follows the correct specification and is actually readable, but does not actually restore it.

During SQL Server’s Jurassic period, a.k.a SQL Server 2000, the RESTORE VERIFYONLY option did already exist. But unfortunately, all it did was to confirm that your backup file conforms to the Microsoft Tape Format (MTF) specification, and that the file could be read from disk. The file could very well be corrupted and SQL Server would still ‘certify’ it as A-OK. This behavior persisted up to SQL Server 2005 but was remedied in 2008 and subsequent versions.

Hence the need for the BACKUP…WITH CHECKSUM option while taking backups, especially for the earlier SQL Server versions. This introduces a checksum into each page of the backup file so that even if a single byte is changed, say due to file corruption, the RESTORE…VERIFYONLY option will fail and you will at least know not to rely on that backup file. Read more about how to enable or disable backup checksum on the official Microsoft page here. In some rare cases your backup utility may not have access to the  CHECKSUM option (such as when using SQL Server maintenance plans). In that case you can enable the option using the trace flag 3023.


So What’s the Downside?

In case it still isn’t clear, it’s a good idea to ALWAYS take your backups using the CHECKSUM option and confirm your backups are ok using the VERIFYONLY option. These two options complement each other and should be used together – yin and yang.

Now you may be thinking: “Hey, this CHECKSUM feature sounds wonderful. Why on earth is it even optional, why not make it standard?” The answer, dear asker of pertinent questions, is because it somewhat costly in terms of hardware resources. Including the CHECKSUM option will make your backups take a little longer because of the higher CPU overhead, plus your restoration will also take a bit longer. This is especially noticeable for very large databases, in the order of tens or hundreds of GB. Still, it is highly recommended to always use the CHECKSUM option for your backups and periodically verify the backup files with the RESTORE VERIFYONLY command.

A Good, Permanent Solution

That said, you have 3 options for making use of the CHECKSUM and VERIFYONLY options in your environment. You can trust yourself to always remember to include the CHECKSUM and VERIFYONLY options. Or you can create an automated script to achieve the same thing, if you have the skill to do this. Or you can employ an easy-to use tool like SQLBackupAndFTP to accomplish this for you. With SQLBackupAndFTP you simply create your backup jobs and define the locations where they should be saved (and these can be local drives, remote FTP locations or in the cloud). Then activate and select the options to always add a CHECKSUM to your backups and run a RESTORE VERIFYONLY after each backup. These options are set in the Advanced tab => More backup options.

more_backup_options

In SQLBackupAndFTP, you can set the CHECKSUM and VERIFYONLY options to be automatically included in all your backups.

Conclusion

Now you know about (and should start using!) the CHECKSUM option in your SQL Server backups, and how to take advantage of the RESTORE VERIFYONLY command to ensure that your database backups won’t let you down when you need them the most. And also that SQLBackupAndFTP is an excellent answer to your need for a simple, useful set-and-forget tool to enable you to always take advantage of these features in your backup regimen.

The post How to use CHECKSUM and VERIFYONLY in SQLBackupAndFTP appeared first on SQL Backup and FTP.


How to save SQL Server backups to Azure in SQLBackupAndFTP

$
0
0

Microsoft’s own Windows Azure cloud is one of the most popular backup options for storage of SQL Server backups. It is especially attractive as an offsite storage medium for SQL Server backups because it is a Microsoft product and is already has tie-ins with the latest versions of SQL Server, beginning with 2012 Service Pack 1, Cumulative Update 2. Let’s take a closer look at  how to save your SQL Server backups to Azure.

Requirements for Azure Storage Backup

Before you can start saving your SQL Server backups to the Azure cloud, you first require a subscription. You can use your Microsoft account to log in, or if you don’t have one can sign up for a new account. Azure offers a free 90-day trial with no obligation to convert to a paid membership – this is a painless way to try out Azure.

Beyond the 90-day free trial period, Azure requires a paid membership. You pay by entering your credit card details. Azure has garnered praise as one of the cloud providers with a simple, straightforward pricing structure, the fact that users only pay for what they use, its per-minute billing, and no upfront or termination fees. See more details about Azure in general and its pricing structure specifically for SQL Server databases.

Next, since you are primarily interested in using Azure as a storage medium, you need to create an Azure storage account. Instructions for doing this can be found on the Microsoft MSDN site. Once this is complete you will also be granted access keys for logging to your Azure storage account and creating containers.

Azure_storage_account2

Azure_access_keys

The next step is to create a container. Containers are virtual objects used to store files uploaded to your Azure account. Set your container’s Access Type parameter to ‘private’. This page contains instructions on how to create a container. Note down or copy the URL of your container – you will require this later.

Azure_blob_container

Finally, you need a credential to access your Azure account. Log in to SQL Server Management Studio (SSMS), expand Security, then right-click on Credentials and select ‘New Credential’. This credential should preferably have the same name as your Azure container. In the ‘Identity’ field, enter the name of your storage account and in the ‘Password’ field enter the access key from your Azure account. Alternatively, you can create a credential using a SQL command with this format:

CREATE CREDENTIAL myCredential WITH IDENTITY = 'your_Azure_storage_account', SECRET = 'your_Azure_access_key';

Azure_credentials_in_SSMS

How to backup to Azure

Now that we are done with the prerequisite requirements, we get to the interesting part – how to actually save your backups in Azure. To do this, use the TO URL option of the BACKUP command. This will generally take the format:

BACKUP DATABASE database_name TO URL = ‘http://your_Azure_container_URL’ WITH CREDENTIAL = ‘your_Azure_credential’, STATS = 5

After this you can then programmatically create a SQL Server script or Windows job to automate the transfer of your backups to Azure. For notifications that the backups and transfers to Azure are successful, you can also configure the sendmail functionality on SSMS.

If you have multiple databases to back up you can either do it manually for each database, or follow these instructions  to configure and use Powershell to automate the process.


An easier way to do all this

Hopefully it is now clear how to create and store backups to Azure. However, if all this sounds somewhat complex (especially the automation part) then rest easy because there is a much simpler solution that is just as powerful and still achieves the same results. The SQLBackupAndFTP application enables you to easily configure your SQL Server environment to take backups of your SQL Server databases and automatically store them in your Azure storage account. To set up your databases to be automatically backed up to Azure in SQLBackupAndFTP, follow the steps below:

  1. On the main setup page, select all the databases you want to back up.
  2. Click on the Add backup destination button and select Azure storage.


Add_backup_destination

3. Enter your Azure storage details – storage account name, access key and container name. You can also add a specific path to upload to under Advanced settings.

Azure_storage_settings

4. Click Save & Close.

That’s it! You’re done. To automate the steps, such as taking daily backups at a specific time, you can also set up a job in SQLBackupAndFTP, and also choose to receive email notifications about your jobs. The complexity of manual setup in SSMS is reduced to a few steps when you use you use SQLBackupAndFTP.


Conclusion

Azure offers a secure, well-integrated storage solution for your SQL Server database backups. Azure setup is straightforward, but automation and notification of your backups to Azure is somewhat less so. SQLBackupAndFTP offers you a simple avenue to taking advantage of Azure as your preferred backup destination.

The post How to save SQL Server backups to Azure in SQLBackupAndFTP appeared first on SQL Backup and FTP.

How to set up Cloud-based Storage in SQLBackupAndFTP

$
0
0

Introduction

A central tenet of Disaster Recovery (DR) is that you should always maintain an offsite or off-premises copy of your critical database backups. The logic behind this is simple – if you don’t have access to your premises, for example in case of a natural disaster affecting your area, your offsite backups mean that you can restore them and still have access to your critical data. Let’s take a more in-depth look at cloud-based storage for your SQL Server backups.

Cloud-based Storage Solutions

With the advent of affordable cloud storage even for enterprises, cloud-based DR solutions are now an excellent option for storing your SQL Server backups. The main advantage of using commercial cloud storage is that it saves you the hassle of having to purchase and maintain your own servers and disks for storage. The downsides of cloud storage are:

  • You have to trust someone else and are no longer in full control of your own backup files.
  • For storage above a certain free tier, you have to pay a monthly fee.

But still, compared to the significant advantages of cloud storage, the disadvantages are acceptable compromises. Your SQL Server backups are critical for recovery of your database and your business operations. For this reason it is advisable to go with one of the large cloud solution providers rather than a smaller unknown one. The latter are ok for your personal files and holiday photos, but for your critical files it is much safer to go for the larger, well-known solutions. Other reasons for choosing the big boys of cloud storage are:

  • They have several data centers both in the U.S. and abroad, so your data is more likely to be physically closer to your own location; this can significantly reduce the round-trip time for data access.
  • They are more likely to offer useful value-adds such as apps for all platforms – Windows desktop and mobile, Android, IOS, MacOS, Linux.
  • The ‘big 3’ cloud providers – Amazon, Google and Microsoft – regularly compete with and try to one-up each other by offering price cuts on their virtual-machine and storage services. For example Amazon has offered more than 40 price cuts for its AWS compute and storage services over the last 3 years alone.

The abovementioned big boys – Amazon (S3), Google (Drive) and Microsoft (OneDrive, Azure storage) mainly offer dedicated storage solutions in addition to their virtual-machine environments. But there are also a number of dedicated enterprise-level storage providers that are also a very good bet for your database backups, such as DropBox and Box.

So how to pick a good cloud storage service? It depends on what your needs and budget are. For example if security is a paramount concern and you require advanced encryption then DropBox’s 256-bit encryption may be just the thing for you. Or Microsoft Azure’s integration with SQL Server may be a deciding factor for you. To learn more read this article for a good quick comparison and overview of the various cloud storage offerings out there, and this other one for a more in-depth look at the various features of the same services.


How to set up your backups to be stored in the cloud

So now that you’ve settled on a cloud storage solution, how do you ensure that your backups are automatically and regularly stored there? Well, almost all of the well-known providers have availed API’s for easy integration of other programs into their environments. You can create your own scripts in SQL Server to back up your databases, and also create programs use the API’s to create scheduled jobs to send your jobs to your cloud storage of choice. This of course requires more than a basic level of knowledge of SQL Server, and API integration and some development/ programming know-how.

Or you can use an alternative like SQLBackupAndFTP. This solution ensures that you really don’t need to have any programming knowledge to take and send regular backups to the cloud. In fact you don’t even have to be an IT professional or DBA to use it.

SQLBackupAndFTP cloud storage solutions

SQLBackupAndFTP cloud storage solutions

SQLBackupAndFTP already includes inbuilt API’s for saving your backups to the most popular enterprise cloud providers – Dropbox, Box, Google Drive, Amazon S3, Microsoft OneDrive and Azure storage. You only need to create a backup job in which you specify the databases you require to backup and the backup frequency. Then click to select one of the inbuilt cloud storage solutions and authorize it to access your cloud account to upload the backup files there on your behalf. It’s really that simple. And the different access methods for the various cloud providers are also automatically taken care of in the user interface as part of the setup. For example Google drive simply requires a one-click authorization access; while for Amazon S3 you have to define and enter a ‘storage container’ and an access key to use. See this post for a more detailed look at Azure storage for SQLBackupAndFTP. And for the cherry on top, SQLBackupAndFTP also includes hassle-free email notifications about your backup success or failure.

Google Drive vs. Azure setup in SQLBackupAndFTP

Google Drive vs. Azure setup in SQLBackupAndFTP


Conclusion

So these are your take-aways from today’s post: first, cloud-based storage is now an excellent go-to solution for your SQL Server backups. And that it is advisable to go with the more established cloud-storage players. But after all of this you still require to set up an automated method of saving your precious backups to your cloud solution of choice. If you have the time and programming chops you can do this yourself. Or if not you can use the simple solution that is SQLBackupAndFTP to achieve this and more.

The post How to set up Cloud-based Storage in SQLBackupAndFTP appeared first on SQL Backup and FTP.

How to take and use Copy-only Backups

$
0
0

duck_familyFor many DBA’s, copy-only backups introduced in SQL Server 2005 are a little-known and little-used feature of SQL Server. However, they can be mightily useful whenever you need ad hoc backups and do not want to interrupt and mess up your existing backup schedule. Read on to find out more.

The Backup Schedule – how does it work?

A typical backup schedule for a busy database may consist of a full daily backup plus several differential backups throughout the day. The schedule for a less-busy setup may shift the full backup to weekly and the differential backups to daily. This ‘chain’ of backups is very useful in case you need to restore your database.

Now, whenever you perform a restore operation, the SQL Server engine needs to ensure that the backups are restored in the correct order. To do this, the server stores an LSN (Log Sequence Number) in each backup file. The LSN is what ensures the correct sequence when performing a restore.

But what if you need a backup in between the week or day? For example you have just made some changes to your production database and need to take a backup of those changes to apply immediately to your standby or testing database to replicate a certain scenario, but you don’t want to wait until the end of day/ week to take this backup. You have 2 options:

  1. Take a normal full backup. But this messes up your LSN differential chain, and if you need to restore your databases, you better have the ad hoc backup you’ve just taken. If not your backup chain is broken, because if you manually take a full ad hoc backup it will update the LSN, and then from that point onwards each differential backup you take via scheduled backup will reference that new LSN, not the original one. In the event of needing to restore, you could restore your scheduled full backup, but when you tried to restore any of the differential backups taken after the ad hoc job it will fail as the LSNs no longer match. A funny alternative is to look at it as a train of ducklings following their mother duck. If you introduce a new ‘mother’ halfway and split the train, all the ducklings behind the new impostor mother will now follow her wherever she goes, instead of following the original mother (and the original will be followed only by those ducklings that were directly behind her and in front of the impostor). So you are now breaking up a happy duck family.


  1. Take a copy-only backup. This is a full backup that does not alter the differential chain. This way you do not affect the LSN chain at all. The LSN’s of any differential backups taken after the new ad hoc backup still refer to the original full backup, not to the impostor. Hurrah! The duck family is still united!


  How to take a copy-only backup

  1. To take a copy-only backup in SQL Server Management Studio, navigate to the backup options window (right-click on Database, select Tasks -> Back Up…). Then check the Copy-only Backup checkbox. Note that copy-only backups can only be full backups – they cannot be differential or act as the ‘base’ in a differential backup plan.Copy_only_backup_SSMS


  1. Using T-SQL, you can also specify the WITH COPY_ONLY option to achieve the same. The basic syntax is shown below; also read about copy-only backups on the MSDN site:  
BACKUP DATABASE database_name TO <backup_device> … WITH COPY_ONLY

Using SQLBackupAndFTP

When using the SQLBackupandFTP tool, taking copy-only backups is a breeze. You simply take a backup, click on Advanced Options -> More Backup Options. This opens up the window shown below. Check the Copy-only backup checkbox and then click Save and Close. That’s how to use SQLBackupandFTP to ensure the duck family is still one.

Copy_only_backup_SQLBackupAndFtp


Summary

Copy-only backups are one of those options that DBA’s should be using more. They are truly useful, and without them life would be just a bit more difficult. You need to first know about LSN’s and your backup schedule to use the copy-only backup effectively, but once you do you will be a better DBA.

The post How to take and use Copy-only Backups appeared first on SQL Backup and FTP.

How to set up SQL Server Email Job Notifications

$
0
0

As a DBA, automating your various jobs on SQL Server – taking backups, truncating logs, updating statistics, etc – is a good idea because it makes sure you don’t have to depend on your feeble memory for these important tasks. And it leaves you free for more vital tasks such as sleeping and bingeing on whatever new Netflix series is out. But to make sure your automated tasks are still running, you need a good notification method, and it should also be automated. And foolproof. So how do you do this?

Types of SQL Server Notifications

A quick background: there are 5 types of SQL Server Agent Notifications you can set up:

  • Email
  • Pager
  • Net Send
  • Write to the Windows application eventlog
  • Automatically delete the job.

SQL_Svr_notification_types

In order to use the Email and Pager option you need to set up Database Mail.  But both the Pager and Net Send options have been deprecated and Microsoft recommends you don’t use these options; they are only maintained for backward compatibility with jobs and notifications set up in older versions of SQL Server. To receive either email or pager notifications you should also enable Database Mail. Setup of Database Mail is outside the scope of this article, but the steps to do so are covered in this MSDN page.

Email Notifications

But we are specifically interested in email notifications, so we’ll focus on those for now. There are three different types of email notifications for a SQL Server Agent job (this also applies to other notification types, not only email): when the job succeeds, fails, or completes.  If you are only interested in a job’s failures, then set it up to only send notifications when the job fails.

To find out which jobs are enabled but do not have any email notifications set up, run the following script:

USE msdb;
GO
SELECT name, enabled, description
FROM dbo.sysjobs WHERE notify_level_email = 0;
GO

To set up an email notification for an existing SQL Server job, open SQL Server Management Studio, expand Jobs, then double-click to open the specific job you want. Select the Notifications menu item and check the E-mail checkbox. Then enter the email address to use and the action to be performed; that is, when you want to be alerted. The options here are: When the job fails, When the job completes, and When the job succeeds.

SQL_Svr_email_notification


A Less Complicated Method

Now, setting up email notifications sounds quite straightforward, and in most cases it is. The tricky part is the perquisite – Database Mail. You require to have already set up an email account (and if you are hosting your own email, also have set up a mail server) and know the requisite port numbers and whether or not your email setup uses SSL. For non-techies this is doable but can be rather bewildering at first.

An easier way to handle email notifications is to use the SQLBackupAndFTP application. With SQLBackupAndFTP you simply check the option of when send you an email: when your job completes, when it fails, or both. And this option is right there on the home page, you don’t even have to dig through the application to find it!

SqlbackupAndFtp_email_notification


SQLBackupAndFTP is easily usable by both the complete novice and IT pro alike. For the novice who doesn’t want to muck around with SMTP settings and mail servers and whether or not to use port 25, he can simply enter an email address to send the notifications to, as described above. For those who want to customize their email notifications they can click the Settings button on the Send e-mail confirmations section. And on the next screen select the Custom option to specify their email server settings. Note that the Automatic option on this page is the same as what was described earlier – simply entering an email address in the Send e-mail confirmations section. There is also a hybrid option to use a Gmail address; you simply enter the gmail address and password to use, and all the other gmail settings are auto-configured for you.

SQL_Svr_email_notification_adv


Summary

For the SQL Server DBA, notifications are a very good idea. Through them you know that everything is still working (or not) in your database, without having to rely on your memory to physically monitor your jobs. Notifications are especially important for important tasks like taking backups and moving or copying the backup files to offline locations for security. And SQLBackupAndFTP is an excellent tool for doing just this. It enables you, whether an email guru or not, to quickly set up your own jobs and email notifications.

The post How to set up SQL Server Email Job Notifications appeared first on SQL Backup and FTP.

How to Backup SugarCRM

$
0
0

sugarcrm logo
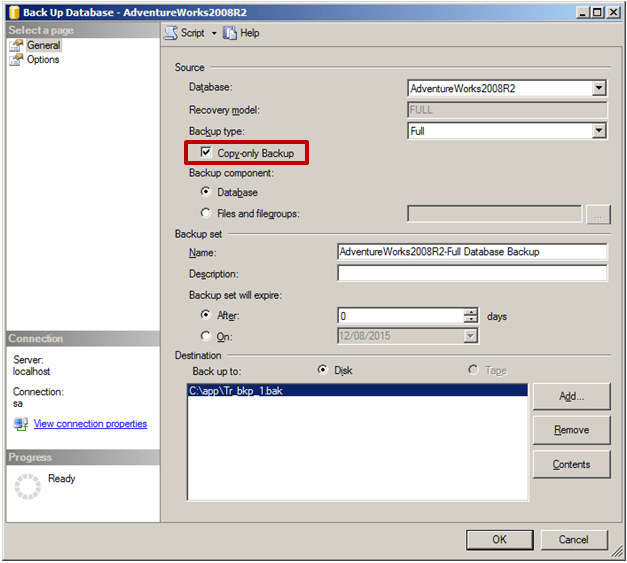
Today over 50,000  companies use SugarCRM globally for their customer management, sales automation and other CRM needs. SugarCRM can be installed as an on-premise solution or as SaaS (Software-as-a-Service) solution. Managing SugarCRM means that you have to work with a huge flow of information that is stored in large databases. Clearly, when working with databases one has to take care of their security, and that implies making backups on a regular basis. Now let’s check how to use SqlBackupAndFtp for regular SugarCRM backups.

First of all you need to connect to your SugarCRM database you want to backup:
SugarCRM database connection

Now you are only 6 simple steps away from your SugarCRM database regular backups:

6 steps to SugarCRM backup

  1. Check off the SugarCRM SQL Server database from the database list.
  2. Add the folder that contains your SugarCRM files.
  3. Select the location where you want to store your SugarCRM backup copy. It can be Local or Network Folder, FTP Server, DropBox, Box, Google Drive, Amazon S3, OneDrive or Azure Storage.
  4. Enter your e-mail address if you want to receive confirmation about your SugarCRM database backup status.
  5. Check off “Schedule this job” to schedule daily backups. If you need more sophisticated backup scheduling go to advanced scheduling settings.
  6. When all settings are correctly adjusted, just press the “Save” button to initiate your regular SugarCRM backups!

Now you can rest assured that SqlBackupAndFtp will make regular backups of your SugarCRM database and will notify you if anything goes wrong.

The post How to Backup SugarCRM appeared first on SQL Backup and FTP.

How to solve Operating system error 3

$
0
0

Introduction

When using SqlBackupAndFtp you may have come across this SQL Server error when saving a database backup: Cannot open backup device ‘<Path\Filename>’. Operating system error 3 (The system cannot find the path specified).

Assuming the full path and file name are correct and actually exist, this error is caused by SQL Server being unable to either access or write to the specified path. This lack of permission can itself have one or more root causes. Let us look at these in more detail.

Possible Reasons for Operating system error 3

This error is most commonly encountered when taking backups that should then be copied over to another computer/ server on the same or a different network. But it can sometimes also occur even on the same computer/ server.

When you get this error, the cause is insufficient file-path access permissions for the operating-system account used by SQL Server. Remember, the login name you have used on Windows is not what is used when running SQL Server jobs. Instead what is used is the account specified for use for the SQL Server service. To check this, open services on the computer where SQL Server is installed (go to Start => Run, type services.msc and hit Enter). Once it opens, look for the service with the name SQL Server and double click it. Navigate to the tab labeled Log On and note down the username listed therein – this is the set of credentials used by SQL Server.

MSSQL_Service_creds

Even though the general cause of this error is the lack of SQL Server access to the backup folder/ path, this may in turn be caused by the following scenarios (with resolutions for each scenario):

  • Unknown drive letter. You may have specified your path to back up to as Z:\Mypath\Backups, where Z: is a drive mapped to a UNC network path. Your SQL Server may be unaware of this mapping. To resolve this, it is better to always specify a full UNC path in SQL Server instead of using mapped drives. So for example Z:\Mypath\Backups should be altered to \\Remote_Svr\C\ Mypath\Backups.


  • The account you specified for your SQL Server service really doesn’t have write permissions on the specified folder or part of it. Check these permissions on the target folder. Right-click the folder and check in the Security tab that the SQL Server service account has explicit permissions to both read and write to the folder. The account may be part of a group, and permissions have been granted to the group not directly to the account. In this case there is no harm in adding the account directly and explicitly granting it the required permissions.


  • Lack of trust between domains. If your SQL Server installation and your remote backup location are on computers in different Active Directory domains, then a lack of trust or expired trust between the domains can also cause this error. This is true even though the SQL Server service account has full permissions on the remote folder it is supposed to write to. To resolve this issue, ensure domain-to-domain trust is properly set up, and also set up the SQL Server service account with pass-through authentication between the 2 domains.


Summary

In SQLBackupAndFTP, this “Operating system error 3” error message is broadly caused by SQL Server being unable to write to a remote folder location. But this may itself be caused by more than one underlying fault. Use the above guide to help troubleshoot the exact cause and then resolve it as necessary.

The post How to solve Operating system error 3 appeared first on SQL Backup and FTP.

SQL Express Backup Made Easy with SqlBackupAndFtp

$
0
0

Sometimes it’s necessary to quickly backup Sql Server database in order take a spanshot or move/copy it to another place. While there are several methods or creating such sql express backup like SQL Server Management Studio or pure T-SQL commands, probably the easiest way to make SQL Express backups is to use SqlBackupAndFtp utility.

How to make sql express backup with SqlBackupAndFtp

Here we will show you how you can perform SQL Express backup with the help of SqlBackupAndFtp. Please follow these simple steps to setup scheduled job that will execute sql server backups:

  1. Download the utility and press “Connect to SQL Server  / Azure” button to connect to  your SQL ServerSql Express Backup: Connect to SQL Server
  2. Check of the databases that you prefer to backup from the list on the leftSql Express Backup: Choose database
  3. Select the backup destination where you prefer to store your backups. SqlBackupAndFtp  allows storing your SQL Express backup in the following storages: Local folder, FTP Server, DropBox, Box, Google Drive, Amazon S3, OneDrive, Azure Storage. Sql Express Backup: Add backup destination 
  4. Check off “Schedule this job” and press “Advanced backup schedule” button to set up scheduled backups. In the “Advanced Backup Schedule” window you can load 1 of the 5 Backup plans or set up your own schedule for your sql express backup:Sql Express Backup: Advanced Backup Schedule
  5. Press “Save” button to save your jobsql express backup save button
  6. The last step is to press “Run Now” to start performing you sql express backup:Sql Express Backup: Run Now button

The post SQL Express Backup Made Easy with SqlBackupAndFtp appeared first on SQL Backup and FTP.


Sql Server Express Backup

$
0
0

While it’s easy to create Sql Server Express backup with Sql Server Management Studio it’s quite difficult to run it regularly since Sql Server Express edition lacks of handy job scheduler maintenance options in comparison with the full version of SQL Server. Here is where third-party backup utilities like SqlBackupAndFtp enter the stage.

How to create Sql Server Express backup with SqlBAckupAndFtp

SqlBackupAndFtp is totally free if you need to backup one or two Sql Server Express databases. Otherwise you can purchase a license (not expensive, really) that allows you to backup 5 or unlimited number of databases according to your needs.

Please follow these simple steps to setup scheduled job that will execute SQL Server Express backups regularly:

  1. After you downloaded and run SqlBackupAndFtp press “Connect to SQL Server  / Azure” button to connect to your SQL Server ExpressSql Server Express Backup: Connect to SQL Server
  2. Check of the databases that you prefer to backup from the list on the leftSql Server Express Backup: Choose database
  3. Select the backup destination where you prefer to store your backups. SqlBackupAndFtp  allows storing your SQL Server Express backup in the following storages: Local Folder, FTP Server, DropBox, Box, Google Drive, Amazon S3, OneDrive, Azure Storage. Sql Server Express Backup: Add backup destination 
  4. Check off “Schedule this job”, then press “Advanced backup schedule” button to tune your scheduled backups. In the “Advanced Backup Schedule” window you can choose one of 5 backup plans or set up your own schedule for your SQL Express backup.Sql Server Express Backup: Advanced Backup Schedule
  5. Press “Save” button to save your backup jobsql express backup save button
  6. The last step is to press “Run Now” to start performing SQL Server Express backupSql Server Express Backup: Run Now button

The post Sql Server Express Backup appeared first on SQL Backup and FTP.

Database Backup Software for MS Sql, MySQL, PostgreSQL

$
0
0

It’s no secret that scheduled backups are the best way to protect your database from disaster. In this article we are going to explain, which database backup software is used for different database systems.

SQL Server Database Backup Software

SQL Server is a very popular relational database management system developed by Microsoft. Currently there are more than ten different editions of Microsoft SQL Server.

The sqlcmd utility lets you execute Transact-SQL statements, system procedures, and script files at the command prompt. So you can start SQL Server backup from command line by simply using the following command:

sqlcmd -E -S <server_name> -d master -Q "BACKUP DATABASE <database_name> TO DISK = N'<backup_file_name>' WITH INIT , NOUNLOAD , NAME = N'my_backup', NOSKIP , STATS = 10, NOFORMAT"

However, if you need to create, zip and encrypt backups periodically, and then get an email notification, then we recommend you to use third party database backup software like SQLBackupAndFTP utility that will do all that for you. All you need is to go through several simple steps to get started with SQLBackupAndFTP:

  1. Download and install the database backup software
  2. Open and connect to SQL ServerDatabase backup software - SQL Server
  3. Choose the database that you want to backup from the list on the left
  4. Add destination place, where you’d like to keep your backup
  5. Set up a scheduled backup
  6. Press “Save” button

MySQL Database Backup Software

MySQL Server is an open-source relational database management system (RDBMS). MySQL is often used in web applications, and is a crucial component of the widely used LAMP open source web application software stack.

Usually MySQL performs backups with the help of mysqldump database backup software. You can use it in a command just like shown below:

mysqldump -u <username> -p<password> <databasename> > filename.sql

This will create a SQL-script, execution of which will restore your database.

But again, the most comfortable way to make scheduled backups is to use third party tools like MySqlBackupFTP. In fact, MySqlBackupFTP internally uses mysqldump as a backup engine. Here’s a quick tutorial how to start working with it:

  1. Download and install MySqlBackupFTP
  2. Open the utility and connect to MySql Server. Please note that you can connect either to MySQL server itself or via phpMyAdmin, which is often more convenient if you backup your database from the remote machine.Database backup software MySQL
  3. Tick off the database that you want to backup from the list on the left
  4. Choose destination folder where all backups will be stored
  5. Set up scheduled backups
  6. Press “Save” button

PostgreSQL Database Backup Software

PostgreSQL (often users call it simply Postgres) is an object-relational database management system (ORDBMS) with an emphasis on extensibility and standards-compliance. PostgreSQL is cross-platform and runs on many operating systems including Linux, FreeBSD, OS X, Solaris, and Microsoft Windows.

PostreSQL uses pg_dump utility to make database backups. It makes consistent backups even if the database is being used concurrently. You can backup your Postgres database using the following command:

pg_dump -U <username> -W -F t <database_name> > backup_file.tar

While it’s quite simple, it doesn’t allow you to make backups regularly. Like in the case of previous database backup software there is a more convenient tool for creating PostgreSQL backups. That is PostgreSQL Backup. It also uses pg_dump internally but makes your life a lot easier and includes tons of useful features.

To start using it just follow a few simple steps:

  1. Download and install PostgresSQL Backup software
  2. Open and connect it to PostgresSQL ServerDatabase backup software PostgresSQL
  3. Tick off the databases you would like to backup from the list on the left
  4. Select destination folder where all backups will be stored
  5. Set up a scheduled backup
  6. To save all settings press “Save” button

With the help of these three utilities you can create scheduled backups for the above three database systems.

The post Database Backup Software for MS Sql, MySQL, PostgreSQL appeared first on SQL Backup and FTP.

Unable to Create Restore Plan Due to Break in the LSN Chain

$
0
0

Sometimes when you restore your database backup you can get “Unable to Create Restore Plan Due to Break in the LSN Chain” error. Let’s see how to deal with it.

Let’s assume that you have to administer a database with the help of Microsoft SQL Server Management Studio (SSMS). All backups are made as scheduled and everything works just fine, and then, all of a sudden, a failure occurs and now you need to restore your database. You have all backups that you need to restore your database, so you start the restoration process from the last full backup with NORECOVERY option. After a successful operation you restore last differential backup file with the RECOVERY option but suddenly something goes wrong and you get the following error message:

Unable to create restore plan due to break in the LSN chain.

Unable to create restore plan due to break in the lsn chain

This error occurs due to a problem with Microsoft products, and can occur in SQL Server Management Objects and only when you use Microsoft SQL Server Management Studio for database recovery.

To solve this issue you need to restore the database manually using the following T-SQL commands to perform full and differential backups:

RESTORE DATABASE your_database FROM DISK = 'full.bak' WITH NORECOVERY, REPLACE
RESTORE DATABASE your_database FROM DISK = 'diff.bak' WITH RECOVERY

If you prefer to continue working with Microsoft SQL Server Management Studio you have to restore backups not one by one but all at once.Unable to create restore plan due to break in the LSN chain (success)

But if you need to restore your full backup quickly, then use One-Click SQL Restore. It is a simple and free tool that restores full MS SQL server database backups.

Also, Microsoft recommends installing the latest cumulative update for SQL Server to avoid getting “unable to create restore plan due to break in the lsn chain” error message in future.

The post Unable to Create Restore Plan Due to Break in the LSN Chain appeared first on SQL Backup and FTP.

SQL Differential Backup

$
0
0

The crucial difference between SQL differential backup and full backup is that differential backup includes all data that have been changed since the last full backup despite the fact that they have been included in the previous differential backup. It means that SQL differential backup is not incremental but cumulative. Look at the following picture to understand what data is stored in a differential backup: SQL Differential Backup

How SQL Differential Backup Works

Each Global Allocation Map interval (GMA interval) covers 64,000 extents (one extent is a collection of eight physically contiguous pages) or almost 4GB portion of each data file has a special database page – differential bitmap. Differential bitmap tracks which extent has changed since the last full backup. Then SQL differential backup reads all bitmaps and stores those data extents that are marked as changed.SQL differential backup ditmap page

Note that a differential database backup size directly depends on the changes that have been marked in differential bitmaps. In order to prevent differential backup from being larger than the full backup it is necessary to make full database backup regularly. It will reset all bitmaps in the differential bitmap. A full backup zeroizes the SQL differential backup size.

Three Ways to Perform SQL Differential Backup

Let’s consider three ways how to make SQL differential backup

With the help of T-SQL command:

With the help of the following T-SQL command, you can make a differential database backup, it’s similar to a command for making full backup but with “WITH DIFFERENTIAL” clause:

BACKUP DATABASE your_database TO DISK = 'diff.bak' WITH DIFFERENTIAL
Use SQL Server Management Studio (SSMS):

Also, you can use SQL Server Management Studio (SSMS) to make SQL differential backup. To do this you need to follow a few simple steps:
a.  Right-click on the database you want to backup

b. Select “Tasks”
c. Click “Back up…”
d. Choose “Differential” type
e. Add backup destination and click “OK”

Use our SqlBackupAndFtp utility:

If you prefer third-party tools, you can use our SqlBackupAndFtp utility to create regular full and differential backups. To start making backups with the help of SqlBackupAndFtp, do this:

a. Download and install the database backup software
b. Open the utility and connect to SQL Server
c. Tick off the database that you are going to backup from the list on the left
d. Choose the destination folder where backups will be stored
e. Set up a scheduled backup
f. Press “Save” button to save the backup jobSQL differential backup (SBF)

The post SQL Differential Backup appeared first on SQL Backup and FTP.

SQL Server Backup Types

$
0
0

Backup TypesRegular backups are required to protect your database and ensure its restoration in case of failure. Various backup types provide different protection to your database. The most popular database backup types are full backup, differential backup and transaction log backup. Before you create your own backup plan you need to consider two things: your recovery point objective (RPO) – how much data can you afford to lose? And your recovery time objective (RTO) – in case of disaster, how much time can you spend restoring your database? Now let’s check out some of the backup types.

Backup Types

In this article we are going to review some backup types, which you can use as a reference information, and we better start with the most important type of backup:

Full Backup

A full database backup is the simplest kind of SQL Server backup that does not depend on the recovery model. It contains all data in a particular database and enough log that is required to recover the database. To execute full backup use the following command:

BACKUP DATABASE Adventureworks TO DISK = 'full.bak' 

Differential Backup

A differential database backup is related to the last full backup and contains all changes that have been made since the last full backup. You can perform a differential backup in the following way:

BACKUP DATABASE Adventureworks TO DISK = 'diff.bak' WITH DIFFERENTIAL

Transaction Log Backup

This SQL Server backup type is possible only with full or bulk-logged recovery models. A transaction log backup contains all log records that have not been included in the last transaction log backup. To apply a transaction log backup to your database use the following command:

BACKUP LOG Adventureworks TO DISK = 'log.bak'

Copy-Only Backup

Use COPY_ONLY option if you need to make an additional full or transaction log backups which will occur beyond the regular sequence of SQL Server backups. To perform copy-only backup simply add “COPY_ONLY” clause:

BACKUP DATABASE Adventureworks TO DISK = 'full.bak' WITH COPY_ONLY

File and Filegroup Backups

These backup types allow you to backup one or more database files or filegroups. To execute file backup use the following command:

BACKUP DATABASE Adventureworks 
FILE = 'File' 
TO DISK = 'File.bck'

Use this command to perform filegroup backup:

BACKUP DATABASE Adventureworks 
FILEGROUP = 'Group' 
TO DISK = 'Group.bck'

Partial Database Backup

Typically partial backups are used in simple recovery model to make backups of very large databases that have one or mode read-only filegroups. However, SQL Server also allows making partial backups with full or bulk-logged recovery models. Use the following T-SQL command to execute a partial backup:

BACKUP DATABASE Adventureworks
READ_WRITE_FILEGROUPS 
TO DISK = 'partial_backup.bak'

The post SQL Server Backup Types appeared first on SQL Backup and FTP.

Viewing all 198 articles
Browse latest View live