Quantcast
Channel: SQLBackupAndFTP's blog
Viewing all 198 articles
Browse latest View live

How to connect to MS SQL LocalDb?

$
0
0
How to connect to MS SQL LocalDb
 
What is LocalDB and how can you connect to it using SQLBackupAndFTP?


LocalDB was first introduced with the CTP3 version of SQL Server 2012. Basically, it is a newer version of SQL Server Express, which has the same characteristics in terms of functionality, but it is mostly dedicated to developers.

It does not require you to install any SQL server. If you have installed SQL 2012 or Visual Studio 11 or higher then you already have LocalDB. Also, it runs only on .Net 4.0 and higher.

How to connect to MS SQL LocalDb

You can connect to a named instance of SqlLocalDB with SQLBackupAndFTP just  by entering the string (LocalDB)\<instance-name> into “Server Name” field at “Connect to SQL Server” window of SQLBackupAndFTP.

How to connect to MS SQL LocalDb

Where <instance-name> is your named instance of SQL LocalDB.

The post How to connect to MS SQL LocalDb? appeared first on SQL Backup and FTP.


Set Amazon S3 access policy to minimum permission

$
0
0
Amazon S3 access policy to minimum permission
Most admins will prefer to create, due to security reasons, accounts for any system with minimum privilieges.
So, now you might wonder how to create a user for Amazon S3 service that has minimum permissions in order to backup databases with SQLBackupAndFTP in a certain bucket and folder? It’s quite easy…

 Set Amazon S3 access policy to minimum permission

In order to do this, as we said, it’s quite easy. You just have to connect to your AWS Console and create a group. After that, specify a policy for the group and add a user to the group. Below are the detailed steps you have to make:

    • Log into AWS Console

In order to log into your AWS Console just go to the following link  https://console.aws.amazon.com/console/home and log in with your e-mail and password.

If you do not have a user just select “I am a new user” which will take you through all the steps of creating a new user.

After logging in, you will see the navigation bar which will have a few menu items on it, at the top of your page. Looking at the right side, click your name and then go to the menu called “Security Credentials”.

Amazon S3 access policy to minimum permission

You might get a pop-up message saying that “You are accessing the configuration page for your root account credentials.”, go on and click “Get Started with IAM Users” in order to set up your security credentials.

On the other side of the page, on the left side, you will see a few items, “Groups”, “Users”, “Roles”, “Password Policy”. Let’s start by creating a group with security policy.

    • Create a group with security policy

To create a new group, please select “Groups” item on the left side of AWS Console and click on “Create New Group” button. You’ll see “Create New Group Wizard” window where you can enter new group name. Please enter group name (let it be SBFGroup) and click on “Continue” button to specify a policy on the next step.

Amazon S3 access policy to minimum permission

The wizard that is going to be displayed will allow you to select from multiple policy templates, but you will select the “Custom Policy” type and manually create one.

At this point we can enter a policy name and manually specify its characteristics. You can find a good user guide here. But, we’re aiming for a specific situation, so we can use this policy document:

{
  "Statement": [
    {
      "Effect": "Allow",
      "Action": [
        "s3:ListBucket"
      ],
      "Resource": "arn:aws:s3:::yourbucketname",
      "Condition": {"StringLike": {
        "s3:prefix": "backup/sql/*"
      }}
    },
    {
      "Effect": "Allow",
      "Action": [
        "s3:AbortMultipartUpload",
        "s3:DeleteObject",
        "s3:GetObject",
        "s3:PutObject"
      ],
      "Resource": "arn:aws:s3:::yourbucketname/backup/sql/*",
      "Condition": {}
    },
    {
      "Effect": "Allow",
      "Action": "s3:ListAllMyBuckets",
      "Resource": "*",
      "Condition": {}
    }
  ]
}

 Be aware that backup/sql/ is the path to your backup files in yourbucketname bucket.

Next, press “Continue” button in order to review the information you added about the new group and then press “Create group”.

Amazon S3 access policy to minimum permission

Now that we have a group which has sufficient permissions in order to make database backups in your bucket using a specified path, let’s continue by creating a user which will be used to backup databases to Amazon S3.

And this is how you set Amazon S3 access policy to minimum permission.

    • Create a user in the group

In order to create a new user for this group, select “Users” which you can find on the left side of the AWS Console and the choose “Create new Users”. A dialog box will open where you can enter the username. Let’s assume it’s called SBFUser.

Amazon S3 access policy to minimum permission

After creating the user a dialog will prompt with an important message saying that : “This is the last time these User security credentials will be available for download.

Please write these credentials either on a physical paper or in a simple text file, because you will need them later in order to connect to the Amazon S3 service with the user you just created. Alternatively, you can download a file with the credentials and keep it on your system.

Amazon S3 access policy to minimum permission

In case you saved the user’s credentials, you can close this window and continue to add the user you created into the group. To do this, just select the user “SBFUser” on the console and then click “Add User to Groups”. You’ll see the “Add User to Groups” window where you will be able to select the created SBFGroup you previously created.

Amazon S3 access policy to minimum permission

Next you will click on “Add to Groups” in order to finalize the action of adding a user to the group and now let’s continue to backup a database with SQLBackupAndFTP into Amazon S3.

If you do not have a bucket, you can create it on this console. Just use the “S3″ option from the “Services” menu to open the S3 console and continue by creating a bucket.

Backup to Amazon S3 with SQLBackupAndFTP

Now, the process of backing up your database to Amazon S3 service is going to be detailed.

The process of backing up a database to Amazon S3 is allowed both in the Standard version of SQLBackupAndFTP and also premium versions. The Free version of SQLBackupAndFTP will allow you to use this feature only during trial mode. In order to enable this mode just go to “Help” menu and select “Start 30 days Free Trial”.

In order to select the database that you want to backup, click the link “Add backup destination” and select the option corresponding to Amazon S3 in the popup window.

Amazon S3 access policy to minimum permission

After this step, you will have to enter your Access Key and your Secret Key, that you already have since you saved them after creating the backup user for your Amazon S3 service. Also add the name of the bucket and the path where your backups will be stored on Amazon’s S3 service.

Please remember to enter the correct path for where the backups will be placed, the one that you have allowed to be used for backups using AWS Console.

Amazon S3 access policy to minimum permission

After all this has been set up continue by clicking “Save & Close” button and now we will have a job that can be used to backup your databases to your backup destination on Amazon S3. You can at this point run the job by pressing the “Run Now” button.

This will trigger a popup window which will display the events that occur during the job, the progress of the job and the success or failure of execution.

Amazon S3 access policy to minimum permission

The post Set Amazon S3 access policy to minimum permission appeared first on SQL Backup and FTP.

Client with IP not allowed access-Azure SQL error

$
0
0

Connect to Azure SQL error-Client with IP not allowed access

Client with IP not allowed access” is not a very common error, but still it does not let you do your job.
Sometimes when using SQLBackupAndFTP you might encounter an error saying that you cannot connect to your Azure SQL Database.
The error looks like: “Cannot open ‘<server>’ requested by the login. Client with IP address ‘<ip-address>’ is not allowed to access the server” 

Unfortunately errors are present in any software system and most of the times, this is due to misconfiguration. The error “Client with IP not allowed access” is one of them. Continue to read the article in order to find the root of the issue and the solution.

Connect to Azure SQL error-Client with IP not allowed access

As we’ve said in our intro to this article, the problem you are having should be in the lines of an error with a text message similar to: “Cannot open <server> requested by the login. Client with IP address <ip-address> is not allowed to access the server.”

The solution in this situation is to login into your Windows Azure Management account and go to “SQL Databases”, on the left of the panel and click your database. Next, look for “Manage allowed IP addresses” link on the page, as can be seen in the screenshot below.

Connect to Azure SQL error-Client with IP not allowed access

Click on the link in order to configure your firewall settings. See the screnshot below as an example.


Client with IP not allowed access

If you need any more information please take a look at this article here, which takes you through the details of backing up a database to Azure SQL.

The post Client with IP not allowed access-Azure SQL error appeared first on SQL Backup and FTP.

Configure SQLBackupAndFTP NLog

$
0
0
Configure SQLBackupAndFTP NLog
If you encounter a situation in which you run a job to backup your database to Dropbox for example or to another storage service you get an error saying: SBFDS5006″: Dropbox exception > Failed to upload file”; “Status: 0. Description: The operation was cancelled
Although the application might try multiple times to run this job, but without success.

First of all, to solve the issue, make sure that you have installed SQLBackupAndFTP version 9.1.10 or higher.

If the problem still persists, please do the following steps, as explained in the below section of how to configure SQLBackupAndFTP NLog.

Configure SQLBackupAndFTP NLog

Save the below XML code into a file called NLog.config and put the file in the same folder as your SQLBackupAndFTP installation (by default it’s :  C:\Program Files (x86)\Pranas.NET\SQLBackupAndFTP).

There are fileName and archiveFileName attributes to specify a folder with log files.

You should configure SQLBackupAndFTP NLog.config file to be something like:

<?xml version="1.0" encoding="utf-8"?>

<nlog xmlns="http://www.nlog-project.org/schemas/NLog.xsd"
      xmlns:xsi="http://www.w3.org/2001/XMLSchema-instance">

  <!-- 
  See http://nlog-project.org/wiki/Configuration_file 
  for information on customizing logging rules and outputs.
   -->
  <targets>
    <!-- add your targets here -->
    <target xsi:type="AsyncWrapper" name="File">
      <target xsi:type="File" name="logFile" fileName="D:\Log\SQLBackupAndFTP\Current\SBF.log"
              layout="${longdate}|${level:uppercase=true}|${threadid}|${logger}|${message}${onexception:|${exception:format=tostring}}"
              archiveFileName="D:\Log\SQLBackupAndFTP\Archives\log.{#}.txt"
              archiveEvery="Day"
              archiveNumbering="Rolling"
              maxArchiveFiles="7"
              concurrentWrites="true"
              keepFileOpen="false" />
    </target>
  </targets>

  <rules>
    <!-- add your logging rules here -->
    <logger name="*" minlevel="Trace" writeTo="File" />
  </rules>
</nlog>

After you finished to configure SQLBackupAndFTP NLog file, save it in your folder, run the job again and in case you receive any errors then please check the the log file for records which start with “Request: Commiting the upload” or “Request: File uploaded”.

Dropbox’s service cancels when uploading a file with chunks, so please try to connect to your Dropbox account with a new token. Go to SQLBackupAndFTP and open the job, remove the existing Dropbox destination, add it again and connect to your Dropbox account then try to run the job again.

By following the above instructions, to configure SQLBackupAndFTP NLog file and re-connecting to your Dropbox account, you should have at this point solved the issue. Please try and run the job now and in case you still encounter errors, please post a comment on this article with the error you are getting or contact us through the form available at: http://sqlbackupandftp.com/contact/

The post Configure SQLBackupAndFTP NLog appeared first on SQL Backup and FTP.

Hot to around: The server principal “NT AUTHORITY\SYSTEM” is not able to access the database “database-name” under the current security context

$
0
0

If you encounter the error message: “The server principal “NT AUTHORITY\SYSTEM” is not able to access the database database-name under the current security context”, you will find the solution below:

Open the scheduled job with SQLBackupAndFTP software and click on “Advanced backup schedule” button. At opened “Advanced Backup Schedule” window you can enter user name to execute the scheduled job in “Run scheduled job as” field or just click on “Set as Current User / Your personal account” to use your current windows account. Please remember to save the job to apply new schedule options. SQLBackupAndFTP will ask you to enter your password when you save the job.

Advanced Backup Schedule

The post Hot to around: The server principal “NT AUTHORITY\SYSTEM” is not able to access the database “database-name” under the current security context appeared first on SQL Backup and FTP.

How to around error: Cannot perform the requested operation on an item that does not exist. Type: Xceed.FileSystem.DiskFile

$
0
0

If you run a backup job manually, it successfully work, however, when it runs as a scheduled job it fails with the error message: “Cannot perform the requested operation on an item that does not exist. Type: Xceed.FileSystem.DiskFile”, you can around this issue with one of the below solutions.

  1. Open the backup job with SQLBackupAndFTP software and setup a temporary folder for the job, for example C:\Temp. You can find this option at “Advanced Settings” window. Advanced Settings
  2. Schedule the job with your credentials using “Run scheduled job as” option at “Advanced Backup Schedule” window. Advanced Backup Schedule

The post How to around error: Cannot perform the requested operation on an item that does not exist. Type: Xceed.FileSystem.DiskFile appeared first on SQL Backup and FTP.

Remote backups with SQLBackupAndFTP

$
0
0
Remote backupsIn this article we will talk about the remote backups option which is provided as a Beta feature in SQLBackupAndFTP.
Continue reading this article to find out more details.

Remote backups

When it is installed locally, SQLBackupAndFTP will use the default BACKUP DATABASE command in order to make backups of your databases. The outcome of this process is that a single *.bak (backup file) will be created, which you can then later restore using the default RESTORE DATABASE command.

For situations in which you use hosted or remote instances of SQL Server ( to which you are able to connect through SQL Server Management Studio), SQLBackupAndFTP will use make the backup of your database using scripting (“remote backups”).

This actually means that at the end of this process instead of getting just one *.bak file with all of your data, you will get several *.sql script files which contain the required CREATE DATABASE, CREATE TABLE and INSERT T-SQL statements which will actually recreate the database on the target server. Generally you cannot use the BACKUP DATABASE command for remote servers because the .bak file (backup file) would be created locally, on the remote server. This would be problematic as you would then have to get the backup file to your local PC or to your other server in order to be able to restore the database.

The remote backup feature is in permanent Beta due to the complexity of the task it executes. There is no chance of doing harm or damaging the existing database during the backup process, but we cannot guarantee 100% the successful completion of the restore operation. You have to try to restore the database by yourself.

Use Remote only if Local Installation is not possible. Also, note that SQL Server 2000 is not supported for remote backups, but all other versions support this.

The post Remote backups with SQLBackupAndFTP appeared first on SQL Backup and FTP.

Set 7zip CPU priority to LOW

$
0
0
Set 7zip CPU priority to LOWAs you might know already, if you’re creating backups and also monitoring your server’s resources you have seen that the CPU is used intensively during the compression phase of the backup operation.
Find out in this article how to set 7zip CPU priority to LOW.

Set 7zip CPU priority to LOW

Unfortunately there is no way to set 7zip CPU priority to low from SQLBackupAndFTP, but there is a workaround for this.

If you already have a job created in SQLBackupAndFTP and you want it to run under low priority mode in terms of CPU usage, all you have to do is create a Windows batch file (.bat extension) where you’re going to call the SQLBackupAndFTP job.

When calling the job you’ll specify some parameters which will set the priority of the process to low. Just follow the below example to set 7zip CPU priority to low:

start "Job 2" /low 
"C:\Program Files (x86)\SQLBackupAndFTP\SQLBackupAndFTP.exe" -r "C:\Users\Administrator\Desktop\DB Rotation.jobx

The post Set 7zip CPU priority to LOW appeared first on SQL Backup and FTP.


How to manage duration of backups

$
0
0

When you are going to save backups on any storage destination (on a local storage or on a cloud service), the first questions most likely are “How long should I keep backups here and how can I setup backup duration with SQLBackupAndFTP?”
SQLBackupAndFTP allows you to setup how long to keep backups for each your destination. When you open a destination settings window, you can find “Auto delete after” options. It has “6 months” value by default, but you can update this value for any storage destination. SQLBackupAndFTP will remove old backups with this option after each job execution.

FTP Settings

The post How to manage duration of backups appeared first on SQL Backup and FTP.

SQLBackupAndFTP: the SQL Backup master

$
0
0
sql backup masterEveryone knows that the most important task that any DBA has to be able to do is to take safe and reliable database backups.
Large organizations or companies usually have a team of Database Administrators (DBAs) which execute these tasks and keep their data safe and easily accessible.

But no matter how small or big an organization, the importance database backups play in the safety and reliability of data is still the same. Common practices across organizations are to upload their backups to remote locations for an increased level of safety.

We as well as many others across the industry totally agree with this approach of having the additional backup stored on a remote location.

Increased redundacy of your data in terms of backups will come in handy in case of a disaster situation.

Now that we have set the details of the most important task, we can now start searching for a solution, but fortunately we don’t have to look very far.

The SQL Backup master

For the most important task in a DBA’s jos schedule there is a tool that simplifies the entire process of backing up data, and it’s called SQLBackupAndFTP.

What sepatest this tool from the competition is it’s simplicity and speed in allowing you to do your tasks safely and efficiently.

It usually does not take more than 1 or 2 minutes to install and set up backups for your databases! If you take a few more minutes to look around you will see that there are more features available to further simplify a DBA’s job while still maintain a high level of safety for your backups and implicitly your data.

To put things in perspective SQLBackupAndFTP is a MS SQL Server software tool for backups that can perform any of the below tasks:

      • Backup SQL Server database
      • Encrypt backup files
      • Archive (zip) backup files
      • Move files to local area network
      • Transfer backup files via FTP to a remote FTP server
      • Send e-mails with the final status of tasks
      • Allows you to monitor job history through a web interface

If you are not yet convinced that SQLBackupAndFTP is the SQL Backup master tool, we will show you an overview of all of its features.

SQLBackupAndFTP features

First of all, SQLBackupAndFTP comes in both FREE versions and Paid versions, which offer a lot more options. Check out this version comparison to find the best one for you. Even the FREE versions offers a lot of features, for example this version is fully functional for unlimited backups through custom backup schedules for up to two databases – this scenario fits most small organizations.

Right after starting the program you can see some of its main features which you are most likely to use.

Just from what we can see in the below screenshot the program will allow you to:

      • easily connect either to your local instance of SQL Server or to your instance running on Azure
      • select what databases you want to back up (and with only one click you can backup all non-system databases)
      • schedule a job which can automatically and periodically do this for you with the frequency you want and at what times you want
      • send e-mail confirmations if the process was successful or if an issue was encountered
      • you can add backup destinations like the most popular cloud services (Google Drive, Amazon S3, Microsoft OneDrive, Dropbox etc.) or even FTP files to a remote server or to a location on your network

sql backup master

Now that we’ve seen what’s on the surface, let’s get into a bit more detail with what options SQLBackupAndFTP offers us. We’ll start with all of the options under the main menu.

SQL Server or Azure

First of all, we will start with what options you have in terms of connecting to your database. As we said, you have two possibilities, either connect to your local SQL Server Instances or to your database that’s running on Azure.

sql backup master

For connecting to your Azure database, we have a small tutorial on another page which you can access from the How to connect to Azure SQL Database link in the software.

Multiple Backup locations

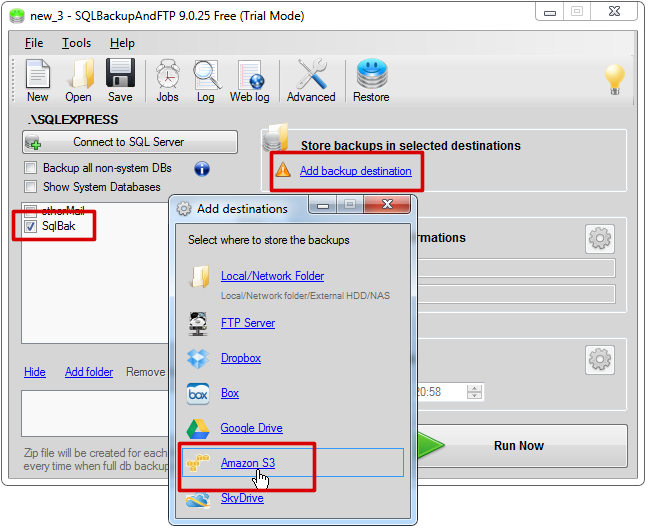
The next feature available right from the main screen is adding the location where your backups will be stored. By pressing the Add backup destination button a small window will appear with the available options for storage.

sql backup master

The FREE version, as you can see above, offers by default the possibility of storing your backups to either the Local Network, to a FTP server, to Dropbox or Box.

For example purposes I will use my Dropbox account and you will see below that it’s quite simple to add. You’ll just have to press the Authorize button which will take you to Dropbox and will ask you to log in to the service and allow access to SQLBackupAndFTP.

sql backup master

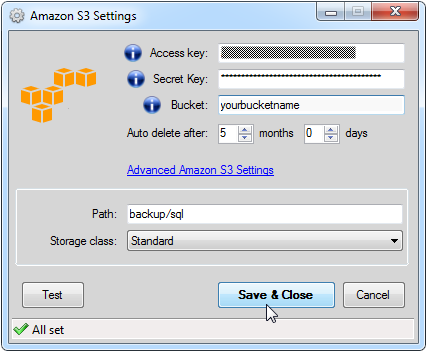
Once you have done this, you’ll just have to add your folder where the backups will be placed and press Save & Close.

sql backup master

As you can see, this was quite easy. Now let’s go over to our next feature, setting up the job schedule.

Set up automatic backup schedule

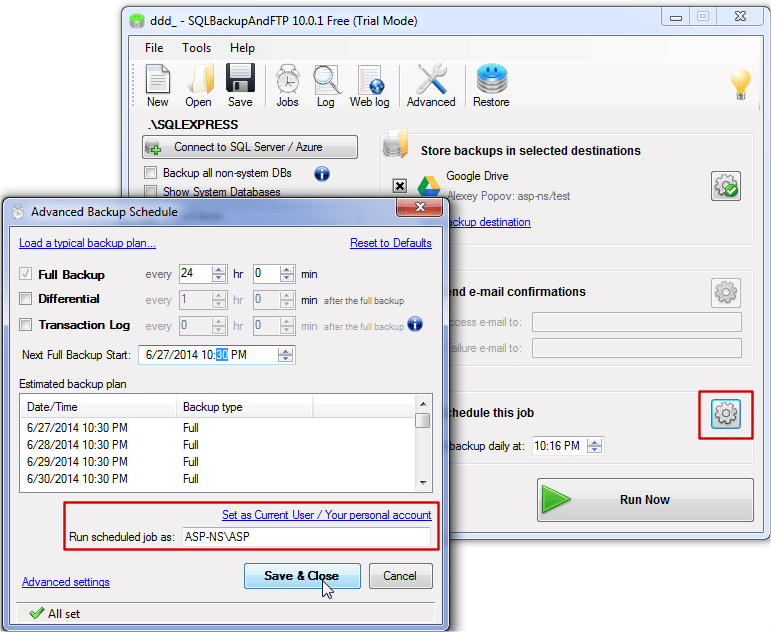
One of the most helpful features is the automatic backup job scheduler. As you can see below, it gives you all the options that you could ever need to set for a backup job.

sql backup master

As you can see, there are also options for creating a more complex schedule which involves taking not only FULL backups but also differential and transaction log backups.

After setting your interval for taking these backups you will also be able to see an estimated backup plan that spans for 24 hours.

After setting up the types of backups you want to be created during your plan you can also choose to receive or send e-mails of confirmation not only after your FULL backups but also after other more frequent backups (differential and/or transaction log).

As you can see there are other features such as choosing if and how frequently do you want the differential and the transaction log backups to be cleaned up (in terms of days).

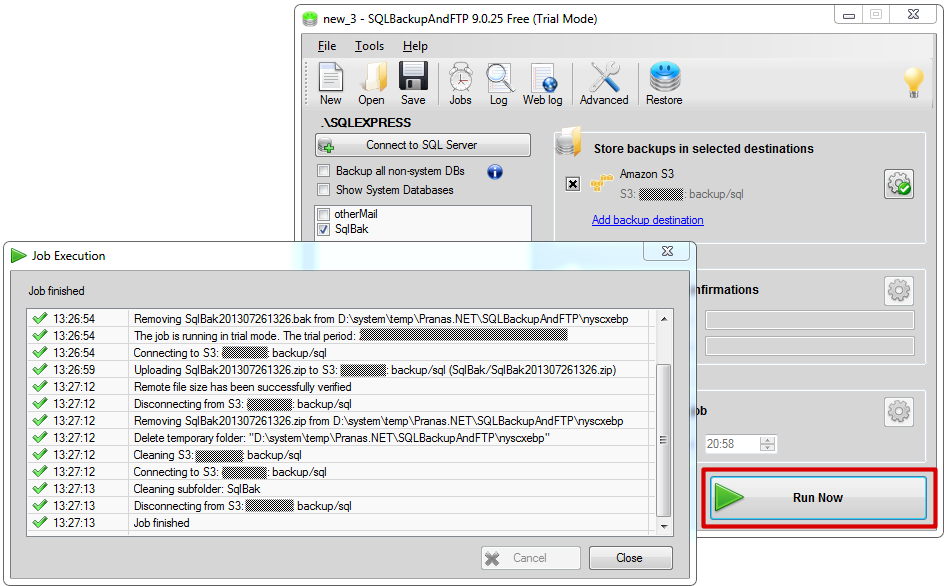
Sending e-mails on status of job status

It is important to know if the execution of your job was successful or not, which is why you can also set up form the main screen of the application. It will open a new window, like the one below, where you can enter the credentials of your e-mail address where you want to be notified.

sql backup master

Custom option will allow you to receive an e-mail on your organization’s e-mail address if it is using a local SMTP server accessible only inside your organization.

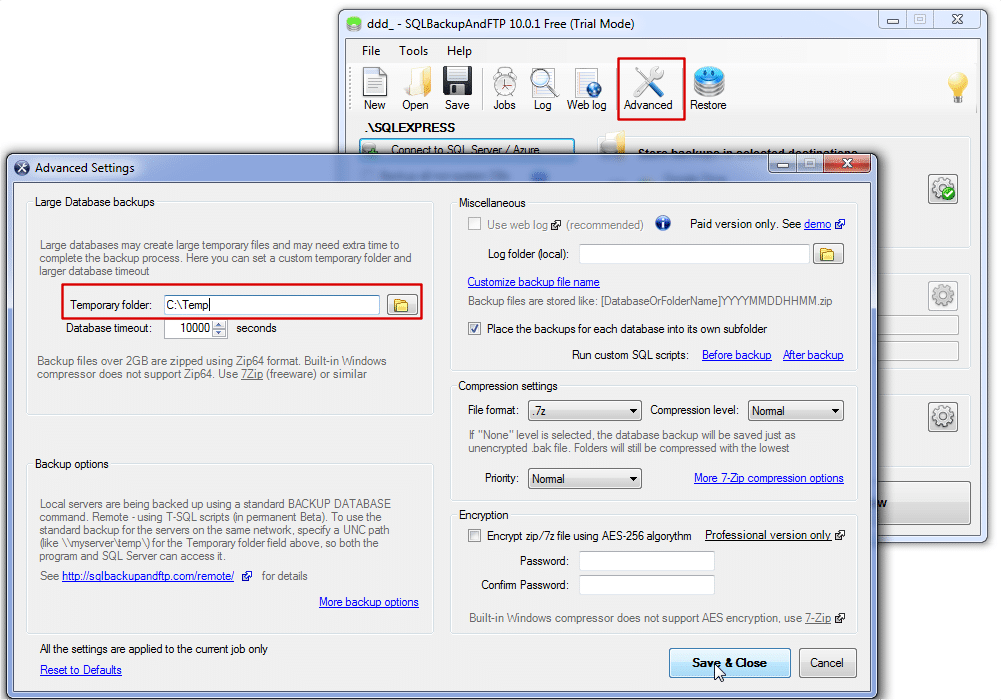
Advanced options for SQLBackupAndFTP

There are a few more options available for SQLBackupAndFTP if we go to the Advanced section accessible from the main window.

sql backup master

sql backup master

We will continue to break down and detail all of the options available from this screen.

First, the Large Database Backups section will allow you to set a temporary folder for creating the backup as the backup process might create large temporary files which need extra time and space. Also, setting a database timeout limit is very useful.

sql backup master

The next section that we can see is in the top right corner and it takes care of Miscellaneous tasks.

sql backup master

The first item that we see in this section is the “Use web log” which is recommended but is only available in a paid version. This will allow you to access the detailed web log of your job.

sql backup master

You can also set the folder you want your log file to be saved on your machine.

Continuing with the available options, we can choose a custom name for your backup, but in order to keep naming best practices applied you are limited to a series of options.

sql backup master

The next option available on the screen is a checkbox which will set each of your backups in its own folder in order to keep your backups organized.

sql backup master

And also, you can have your custom SQL scripts run right before or after the backup process.

The next advanced option available is from the Backup options side of the window (bottom left) from where by pressing More backup options we will be taken to a smaller window.

sql backup master

This smaller window has a few checkboxes where you can choose what verification tasks are to run for your job in order to check if the backup is consistent.

sql backup master

In the middle right side of the Advanced Options screen we have the Compression settings section where we can set the format, compression level and the CPU priority of our compression process.

sql backup master

By accessing the More 7-Zip compression options link a new window will appear where you can add command line style parameters for the execution of the compression process.

sql backup master

The last option in the Advanced screen is found at the bottom right side of the window and it’s the Encryption section where you can choose to add a layer of increased security by encrypting the file using AES 256bit algorithm.

sql backup master

We think that SQLBackupAndFTP offers easy access to some of the most used and/or the most necessary features that make a backup process safer and easier for a DBA.

Easy access to scheduling and customized plans offer flexibility, encryption possibilities add security to your backups, notifications will always keep you aware of what is in need of attention, backup file verification options make sure that you have the required consistency of your data inside your backup and we could go on.

As we enumerated before, there are a lot of features for which we consider and hope that by this point you too will also consider that SQLBackupAndFTP is the true SQL Backup Master.

The post SQLBackupAndFTP: the SQL Backup master appeared first on SQL Backup and FTP.

How to remove old SQL server backups

$
0
0

remove old sql server backup

How to remove old SQL Server backups - quick tutorial:
Managing storage space occupied by your backups is a task which should not require a DBA’s time.
With SQLBackupAndFTP you can easily remove old SQL Server backups, periodically.
In this article we will show you how to do this, step by step, so you will never have to worry about old backup files filling up your storage space.

Remove old SQL Server backups – SQLBackupAndFTP

When setting up a task to remove old SQL Server backups you only have to do a few more clicks and you won’t have to worry about cleaning up the backup folder.

If you already have set up a backup job with SQLBackupAndFTP, then all you have to do is press the Settings button and then go to Advanced Settings, like in the screenshot below.

remove old sql server backups

Full Backup option will be automatically selected as per suggested best practices.

By selecting other backup types, the Auto-delete option becomes available to select through a tickbox. The reason for this is because after each Full backup, previous differential and transactional backups will generally become obsolete (as their data should be included in the last Full backup) thus you can remove them to save disk space.

You have the option of keeping them in your backup folder for an additional time in case you find it easier to restore to a specific point in time with differential and transaction logs (T-SQL option or SSMS option). You can set the number of days after the FULL backup they were created with when they are going to be automatically removed from the storage folder.

This process to remove old SQL Server backups, by being set up this way, does not require any personnel intervention, which is why it’s a great option to use in addition to any of your backup plans.

The post How to remove old SQL server backups appeared first on SQL Backup and FTP.

How to get SQL Server backup email notification

$
0
0

SQL Server backup email notification

 Ever needed to know if your backup job has finished succesfully or has encountered any issues?
Would you like to get from SQL Server backup email notification to let you know if your task has succesfully finished or not?
Read this article to find out how to do this, really easy with the help of SQLBackupAndFTP

This article will show you how to easily chose to receive this valuable information, with the help of SQLBackupAndFTP.

How to get SQL Server backup email notification

As we’ve already stated, staying informed abouthe the status of your backup jobs is important in order for you to take action in case there are any unfortunate issues with the task and it does not complete successfully.

With SQLBackupAndFTP you can choose to receive SQL Server backup email notification for your backup jobs with a few clicks!

If you already have a backup schedule set up with SQLBackupAndFTP all you have to do is just check the section highlighted in the image below and input e-mail addresses for success and failure notifications.

SQL Server backup email notification

You also have multiple options for selecting the e-mail account/server with which you want the e-mail addresses to be sent from, in case the contacts you want to send e-mails to are out of your network.

Selecting the Automatic option will send the e-mail using a webservice from SQLBackupAndFTP.

SQL Server backup email notification

But, you can also select the G-Mail option and only input your e-mail / username and password combination to send e-mail addresses using your G-Mail address.

SQL Server backup email notification

In case these options are not sufficient, you also can send SQL Server backup email notifications using other web mail servers by selecting the Custom option on the below screen and inputting the e-mail address you want to send notifications from, the Mail Server address and the port number for the mail server.

SQL Server backup email notification

And this is how you easily send e-mail notifications with SQLBackupAndFTP with the status of your backup job!

The post How to get SQL Server backup email notification appeared first on SQL Backup and FTP.

How to encrypt SQL server backups

$
0
0
encrypt SQL server backups
 
Make sure to encrypt SQL server backups in order to add another level of security to your data.
Adding this option to your backups is extremely easy with the help of the Encryption option in SQLBackupAndFTP.
 Read the short tutorial in this article below to encrypt your backups.

Encrypt SQL Server backups for added security with the smallest effort by using SQLBackupAndFTP. Before we start, consider the following scenario in order to understand why encrypting is an important aspect which you should not neglect.

Even having specific users who will have access to the databases on your instance server, this does not mean that your data is not accessible. If you have created backups of your data, then people could get access to them and thus to your data. This is why encryption is also a very powerful and important feature which should be used everytime when you are doing backups.

In order to add a new layer of security for those that might get access to a backup of your database, there is the option to encrypt SQL Server backups with standardized AES encryption algorithms.

Encrypt SQL Server backups

There are multiple ways to encrypt SQL Server backups, but one of the simplest ways is by using SQLBackupAndFTP and its one click encryption process.

All you have to do is mark a checkbox and set up the backup password which you will have to input when trying to unzip the backup file.

encrypt SQL server backups

All you have to do, as you can see above is to access the Advanced Settings screen from SQLBackupAndFTP and there you can find the Encryption section where to input the backup file password.

Save and close this window and from this point on all of your backups will be created and protected with this encryption password.

The post How to encrypt SQL server backups appeared first on SQL Backup and FTP.

How to perform SQL Server maintenance

$
0
0

SQL Server maintenance

SQL Server maintenance is just as important as creating backups of your databases.
Without a doubt there are a lot of organizations that install a SQL Server database or more without setting their maintenance plans up first 
Things generally go smoothly and at the beginning there is no problem, that is, until a problem appears.

SQL Server maintenance

It’s very rare that a database server completely fails, most of the times when an issue occurs you can notice a drop in terms of performance as the server runs out of disk space or operations are very slow to perform, before the database becomes corrupt.

This kind of scenario shows proof as to why it’s important that besides backup plans for your database, you have set up maintenance plans.

Usually you will have a simple operation/task that you want to run as part of your maintenance or backup plan. Most of these simple and general tasks are already available in SQL Server and can be set up through the available Maintenance Plan options.

But most of the times you are not the creator of the maintenance plan and you have just recently joined the DBA team at your organization and have to continue with their plan.

If their plan involves running a custom written SQL script, there’s good news as these scripts can be ran directly from SQLBackupAndFTP before and/or after, depending on how your plan is set up, the backup process is executed.

When opening SQLBackupAndFTP just go to Advanced Options and under the Miscelaneous section (top right side of the window)

SQL Server maintenance

you will find two buttons which will allow you to add your custom SQL Scripts.

SQL Server maintenance

Also, there are predefined environment variables which will give you the possibility to improve the flow of your script.

The post How to perform SQL Server maintenance appeared first on SQL Backup and FTP.

Limited Offer: 50% OFF SqlBackupAndFtp Professional Lifetime!


How to verify SQL Server backup files after backup

$
0
0
verify sql server backup files after backup
 One of the most often made assuptions is that if you have made a backup of your database, your data is safe.
Unfortunately this is not true, and I’ll explain why, but don’t forget to verify SQL Server backup files after backup!
SQLBackupAndFTP allows you to do this, in order to be absolutely sure that indeed, your data is safe!

Verify SQL Server backup files after backup

Just as the title of this section shows, you have to verify that the backup file has been created correctly, which will then ensure that the data is also consistent.

The reason why this is important is because although the process of backing up your database might finish with a success message, the actual file could be, for example, saved on a disk which is damaged. Thus, when trying to restore the database from the backup file, the restore might either fail or data will not be recovered fully or correctly.

In order to avoid this, there are options which allow you to verify SQL Server backup files after backup operation has finished.

SQLBackupAndFTP has this option and you can enable it very easy by doing the following steps.

      • Access the Advanced Options section

verify sql server backup files after backup

      • Going down and pressing More Backup Options will open a window where you have to these special features

verify sql server backup files after backup

      • In this window you must check the two options which are highlighted below.

verify sql server backup files after backup

These options will ensure that a CHECKSUM operation is performed during the backup operation. This checksum operation is a mathematical check which in essence makes sure that the exact data that is in your database is correctly copied and saved in the backup file.

The RESTORE VERIFYONLY option will verify the backup file after it is created by simulating a restore operation, but not actually restoring the file. This operation in turn will assure you that you won’t have any problems when the time comes to do the actual restore.

The post How to verify SQL Server backup files after backup appeared first on SQL Backup and FTP.

How to backup a SQL Server database to NAS drive

$
0
0
backup a sql server database to nas
 Backing up your database is one of the most important tasks a DBA should have set. There are multiple options in terms of backing up a database, for instance you could backup a SQL Server database to NAS drives.
If you prefer this option or if your organization requires you that you backup your databases on your local network then you can count on SQLBackupAndFTP to assist you with this and make the job much easier!

How to backup a SQL Server database to NAS drive

One option in terms of locations where to backup your database is a NAS drive. In order to backup a SQL Server database to NAS drives, we recommend using SQLBackupAndFTP due to how easy it is to set this up, along with other options to make your backup process more efficient.

All that you have to do is set up a backup schedule and a corresponding backup location where you want to backup a SQL Server database to NAS drives as we will show in the screenshots below.

    1. First step is to set up a backup destination (your NAS drive)step1
    2. A small window should appear where you will have to select the first option, like below.zeb1
    3. After this step, you’ll have to set up the network folder from the NAS drive in the form of a UNC path.

backup a sql server database to nas

If accessing the network folder on the NAS requires an authentication and/or authorization step, then you have the possibility to add these verification credentials at the bottom of the window in the user name and password fields.

After adding the details for the connection to the NAS you can use the Test button in order to verify that the connection is indeed correct and working.

All that remains now is to press the “Save&Close” button and set up a backup schedule, if you don’t have this already set up.

The post How to backup a SQL Server database to NAS drive appeared first on SQL Backup and FTP.

Backup SQL Server Database from command line

$
0
0
backup SQL Server Database from command lineOne of the most important operations and tasks that need to be performed on a database is the backup process.
In this sense you can prompt to backup a SQL Server database from the command line using SQLBackupAndFTP with some additional parameters, which are also passed in the command terminal.

SQLBackupAndFTP offers multiple options for backing up your databases, using commands from the command prompt terminal.

 Backup SQL Server Database from command line

These command line options will allow you to achieve different tasks, like backup SQL Server Database from command line or open and edit a backup job, schedule a job to run etc.

 Below is a list of some of the commands you can run to achieve different tasks:

    • In order to run a job (either immediately or based on a schedule) you should run the following command:
SqlBackupAndFTP.exe -rn <filename.jobx> [{-diff|-log|-fullcopy|-logcopy}]

Examples of commands to Backup SQL Server database from command line:

"C:\Program Files\SQLBackupAndFTP\SQLBackupAndFTP.exe" -rn "C:\new.jobx"
"C:\Program Files\SQLBackupAndFTP\SQLBackupAndFTP.exe" -rn "C:\new.jobx" -diff
"C:\Program Files\SQLBackupAndFTP\SQLBackupAndFTP.exe" -rn "C:\new.jobx" -log
"C:\Program Files\SQLBackupAndFTP\SQLBackupAndFTP.exe" -rn "C:\new.jobx" -logcopy
"C:\Program Files\SQLBackupAndFTP\SQLBackupAndFTP.exe" -rn "C:\new.jobx" -fullcopy 

If you like to perform other types of operation on jobs, below you can find the commands for two of the most common actions:

      • Opening a job for editing with SQLBackupAndFTP:
SqlBackupAndFTP.exe <filename.jobx>
      • In order to schedule a job to run with SQLBackupAndFTP:
SqlBackupAndFtp.exe -s <filename.jobx> [<username> <password>]

These are the commands for the most common operations which allow you to backup SQL Server Database from command line prompt while using SQLBackupAndFTP.

Important Note:

Whenever you are scheduling a job with SQLBackupAndFTP from the command line, it automatically uses the “-rn” option. This option is recommended in order to achieve better performance for your backup job compare to using the “-r” option.

If you need to see the output of the job in the console, then you should use the explicit “-r” option instead.

The post Backup SQL Server Database from command line appeared first on SQL Backup and FTP.

Cannot perform a differential backup because current backup does not exist

$
0
0
cannot perform a differential backup
Cannot perform a differential backup for database, because a current database backup does not exist” is not a common error, which is why you might have a hard time finding a solution or an answer to it.
This is why we have written an article to explain why this is happening and how to resolve this problem.
Click to find out more details!

Before we begin with the solution for this problem, we think it’s best to add some context around the problem, so we could better understand the solution and why the problem occurs, so we wouldn’t encounter it again in the future.

Differential backups are backups of the changes that have occured since your last FULL database backup. This way, you can’t run a differential backup process without first having a FULL backup in place.

Cannot perform a differential backup

The most common cause for this issue ocurring is if you have another backup software (NTBackup, BE, Bacula etc. ) which takes a snapshot (VSS copies – Volume Shadow Copy) of your database, then this can cause the chain of backups to be broken and invalidate your previous DIFFERENTIAL backups, which is why when your current DIFFERENTIAL backup process starts, it will fail as it can’t see that a initial FULL backup or another DIFFERENTIAL backup has occurred before it.

As you can see in this article here, NTBackup is one of the tools which could cause this.

The solution

Depending on what software tool you actually use for creating these snapshot backups of your database, the solutions are different. We will cover NTBackup for which we know there are answers and if you find any solutions to this same problem, but for other software products, please leave a comment and we will integrate your knowledge into this article, so others can find the solutions much easier.

The solution for NTBackup

When using NTBackup, the solution is to check that the Service for SQL Server VSS Writer is set to “Startup Type: Manual” and the service is Stopped.

When a snapshot (VSS Copy) is taken of the database, if this service is running then the VSS Writer service will lock the Full Recovery model and this will cause the backup chain to be broken.

In order to update these settings on the service, you have to go to the “Start Menu” and access “Services” and find the “SQL Server VSS Writer” service.

cannot perform a differential backup

Right click the service and set the Startup Type to Manual and make sure to stop the service, so that if you ever restart the machine the server is installed on, the service won’t automatically restart and cause the backup chain to break again.

cannot perform a differential backup

This issue can suddenly appear if you do an upgrade to your SQL Server version, for example upgrading from SQL Server 2005 to 2008R2 and during the installation process, the default values for this service can change and be set to Automatic and the service turned on. So, for example if you are using the same backup process and still using another software solution to take snapshots and if you have started encountering this problem after an upgrade, then this might be the problem and above you can find the solution.

If you are using other software solutions to take Shadow Copies of your database and you encounter the same error, please leave a comment and we will try to find solutions for your situation as well. Also, if you have encountered this error and managed to solve it, please leave a comment on how you solved the issue and we will integrate it in the article, so others could benefit from the solution.

The post Cannot perform a differential backup because current backup does not exist appeared first on SQL Backup and FTP.

Learn the Ways to Recover MySQL Root Password without Restarting

$
0
0
Recover MySQL Root Password without Restarting
When you are using the master production server and there appears a need to recover the root password in MySQL, you cannot restart at once. The remote database experts suggest the few ways by which you can come out of this situation.

Click to read the article and to find out how to resolve this!

This is a guest post byCharlie Brown, one of the well known remote database experts. In this article he is sharing some simple methods to recover the root password without restarting MySQL.

Recover MySQL Root Password without Restarting

    • A smaller version of mysqld can be launched without using the InnoDB
    • The user files can be copied from the original datadir file to the new smaller file created. For example the user files can be like : [frm/MYD/MYI]
    • After the modification, the files can be set back to their original position

So, let us go through the process of recovering the root password:

During Fresh Installation:  

When a fresh installation takes place in MySQL, there is no previous default password present. Therefore, you can use the command for updating the new password:

Mysqladmin –u root password <YOUR PASSWORD> (where <YOUR_PASSWORD> is your planned one)

The password will automatically get copied in the history logs. Therefore you are required to activate history –c to clear your history in whole and then enter the password in plain text.

You can utilize the MySQL client for installing the fresh password:

  • Activate mysql mysql –uroot for logging in the local server of the MySQL and modifications can be done in MySQL database
  • Go through UPDATE user SET password=PASSWORD ( “< YOUR_PASSWORD”>) WHERE User = root  as soon as the MySQL client signals for the change in the root password
  • Enter FLUSH PRIVELEGES for enabling the use of your new password
  • Type \q for getting out of MySQL client
  • Enter mysql –uroot  -p and then activate your new password for ensuring that the change has taken effect

 During The Locked Out Situation: 

If you get locked up in the database of MySQL, you can reset your root password for an easy access. You can use the command line below and get out of the situation:

  • You need to log in as the root user or can switch the previous user accounts
  • Activate /etc/init.d/mysql stop for shutting down MySQL ( the server needs to shut down completely before the next step)
  • You can enter mysqld_safe –skip grant-tables –skip networking & for restarting MySQL without any network access or authentication formalities
  • Mysql mysql –uroot can now be entered for logging into the MySQL server for applying changes in the MySQL database
  • After that , enter UPDATE USER SET password=PASSWORD ( “<YOUR_PASSWORD”>) WHERE User = root  as soon as the MySQL client signals for the change in the root password
  • Enter FLUSH PRIVELEGES for enabling the use of your new password
  • Type \q for getting out of MySQL client
  • Enter mysql –uroot  -p and then activate your new password for ensuring that the change has taken effect

Both in case of fresh installation and in the locked out situation, the steps are more or less similar, but they are different in the initial steps.

Reset Script Of Root Password:

#!/bin/bash
#
#MySQL Root Password Reset Script
/etc/init.d/mysql stop
Mysqld safe –skip grant tables—skip –networking &
Mysqlasmin –u root password “ “
etc/init.d/mysql restart
mysql mysql -uroot

Therefore the downtime can easily be avoided if there is a need of recovering the root password. We can easily recover the password without restarting the MySQL .In case you face the similar situation of recovering the password, just do not worry! Apply all the steps for the fast recovery and be aware of the modifications. If you know some other simpler methods to recover the password ignoring the downtime, do not forget sharing them with us!

The post Learn the Ways to Recover MySQL Root Password without Restarting appeared first on SQL Backup and FTP.

Viewing all 198 articles
Browse latest View live