This step-by-step guide helps a user having a Microsoft Azure account to create Microsoft Azure SQL Server on Linux (Ubuntu) with no charge and to use the free SQL server on Ubuntu with SSH terminal.
Prerequisites
- SSH terminal;
- Account on Microsoft Azure.
Note: Microsoft Azure SQL Server on Ubuntu is free of charge (as for November 2017) although when installing it on Azure it says at first that it costs some money.
How to Create Azure Linux Virtual Machine with SQL Server
Step 0
Use your account’s dashboard (see below) to start creating a new Microsoft Azure entity.
![NEW Dashboard Microsoft Azure]()
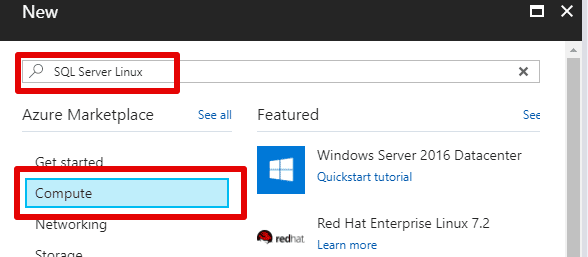
Click on “New” (see above), then see a menu (see below).
![New SQL Server Linux Microsoft Azure]()
Choose “Compute” section and type “SQL Server Linux” in the search field (see above).
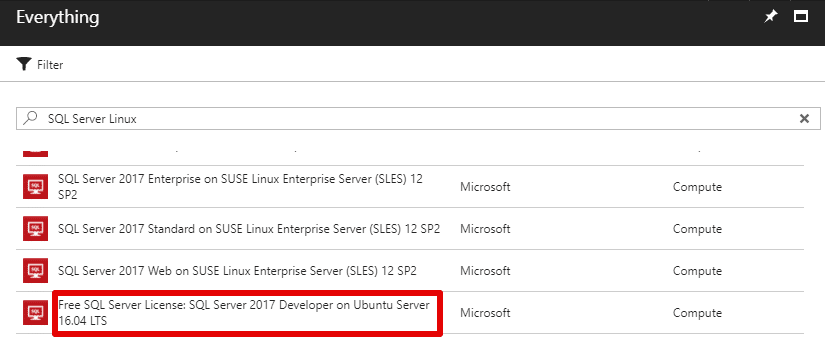
After the search is done see a list of SQL servers available (see below).
![Find SQL Ubuntu Microsoft Azure]()
Find in the list above “Free SQL Server License: SQL Server 2017 Developer on Ubuntu Server 16.04 LTS” and click on it.
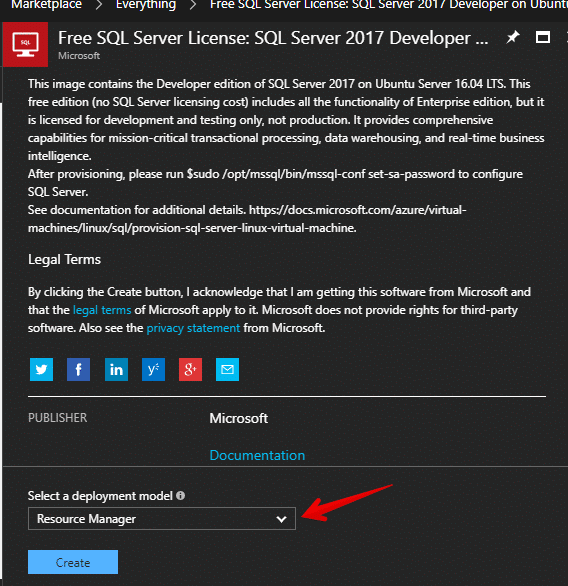
Then there will be a picture like this:
![CREATE Free SQL Server 2017 Developer on Ubuntu Server 16.04 LTS Microsoft Azure]()
See where the red arrow is and change the “Resource Manager” to simple “Classic” there.
Push the “Create” button to create SQL Server 2017 Developer on Ubuntu following the steps below.
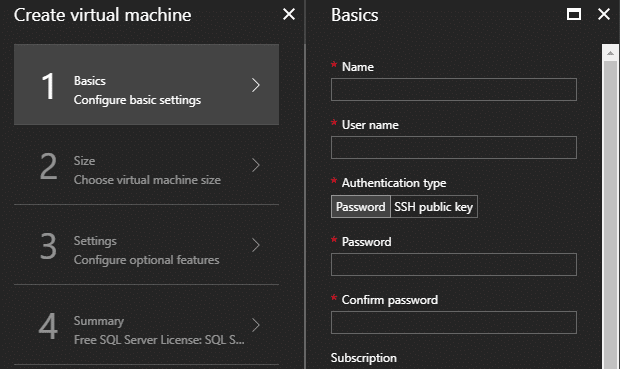
Step 1
![CREATE Basics SQL Ubuntu Microsoft Azure]()
Name the SQL server, choose the User name, Password, etc.
Step 2
![SIZE SQL server Ubuntu Microsoft Azure]()
Choose the size of your SQL server on Ubuntu.
Don’t pay attention to pricing; this is not the case, this one goes for free of charge.
Push “Select” button.
Step 3
See the parameters there and change them, if you want, then click on “OK” button.
Step 4
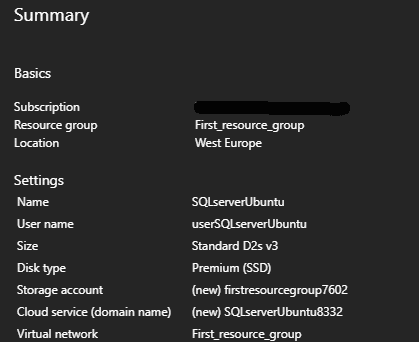
See the Summary and check the options, names, etc.
![Summary SQL server Ubuntu Microsoft Azure]()
Push “OK” button.
That’s it!
Note: if you are waiting here too much, then just refresh the screen (sometimes it helps).
Now you should have Microsoft Azure SQL server on Ubuntu at your disposal, see the Overview of the SQL server on Ubuntu:
![OVERVIEW SQLserverUbuntu Microsoft Azure]()
How to connect to Azure SQL Server on Linux (Ubuntu)
Connecting SSH Terminal to Ubuntu Server (Ubuntu Virtual Machine)
Take parameters for the SSH terminal connection to Linux (Ubuntu) server from the parameters list of your Ubuntu virtual machine (Ubuntu server) created according to the previous chapter of this article.
For example, take “DNS name” from your Azure “SQL Server on Ubuntu” screen shown at the previous picture and copy it to the “Host” field in the Xshell New Session Properties window, if you use Xshell terminal.
Preparing Azure SQL Server on Ubuntu
Type the following Microsoft instructions into your SSH terminal window:
curl https://packages.microsoft.com/keys/microsoft.asc | sudo apt-key add -

sudo add-apt-repository "$(curl https://packages.microsoft.com/config/ubuntu/16.04/mssql-server-2017.list)"

sudo apt-get update
After the last command there should be a long list like the following.
![List after update AZURE SQL on Ubuntu]()
Continue typing.
sudo apt-get install -y mssql-server

sudo /opt/mssql/bin/mssql-conf setup

systemctl status mssql-server

curl https://packages.microsoft.com/keys/microsoft.asc | sudo apt-key add -

sudo add-apt-repository "$(curl https://packages.microsoft.com/config/ubuntu/16.04/prod.list)"

sudo apt-get update
After entering the last command there should be a long list similar to one from the above black-and-white window.
Continue typing.
sudo apt-get install -y mssql-tools unixodbc-dev

echo 'export PATH="$PATH:/opt/mssql-tools/bin"' >> ~/.bash_profile

echo 'export PATH="$PATH:/opt/mssql-tools/bin"' >> ~/.bashrc

source ~/.bashrc

sudo /opt/mssql/bin/mssql-conf setup
After entering the last (“setup”) command from the list you will be asked for two things.
(1) The first thing (see the following text in black-and-white):
Choose an edition of SQL Server:
 1) Evaluation (free, no production use rights, 180-day limit)
 2) Developer (free, no production use rights)
 3) Express (free)
 4) Web (PAID)
 5) Standard (PAID)
 6) Enterprise (PAID)
 7) Enterprise Core (PAID)
 8) I bought a license through a retail sales channel and have a product key to enter
Choose your option (Developer for this case).
(2) The second thing:
Enter the SQL Server system administrator password:
Type in the password.
Note: the password here must contain CAPITAL letters, small letters, numbers and other (non-alphanumeric) symbols, although the system doesn’t say it clearly. 8 characters is the minimal length for the password.
Now the connection to the SQL server on Ubuntu should work.
Check its version just in case to see that the server is really up and running.
SELECT @@VERSION
The result text should be like this:
Microsoft SQL Server 2017 (RTM-CU1) (KB4038634) - 14.0.3006.16 (X64)
 Oct 19 2017 02:42:29
 Copyright (C) 2017 Microsoft Corporation
 Developer Edition (64-bit) on Linux (Ubuntu 16.04.3 LTS)
Now the SQL server on Linux (Ubuntu) is ready to use.
Testing SQL Server on Linux (Ubuntu)
A user can start using Microsoft Azure SQL Server on Linux (Ubuntu) by means of sqlcmd command-line tool.
Note: sqlcmd tool has been installed during preparations.
See below the final command to start to use the SQL server on Ubuntu:
sqlcmd -S localhost -U SA -P '<SQL Server system administrator password>'
Note: <SQL Server system administrator password> is the same “SQL Server system administrator password” that you defined above answering the above question (2).
If successful, you should get to a sqlcmd command prompt from the Microsoft Azure SQL Server on Ubuntu:
1>
Note: any command typed after the prompt transforms the above “1>” to “2>”, then to “3>” and so on, but the counting stops when you type “GO” (then the counter starts from “1>” again).
A user may follow instructions from the above Microsoft site, having sqlcmd prompt at the beginning of each command from the following command sequence.
CREATE DATABASE TestDB

SELECT Name from sys.Databases

GO
Here you have to have the following text on your screen (the list of databases available).
Name
--------------------------------------------------
master
tempdb
model
msdb
TestDB

(5 rows affected)
There is a way to continue testing.
USE TestDB

CREATE TABLE Inventory (id INT, name NVARCHAR(50), quantity INT)

INSERT INTO Inventory VALUES (1, 'banana', 150);

INSERT INTO Inventory VALUES (2, 'orange', 154);

SELECT * FROM Inventory WHERE quantity > 152;

GO
Note: DON’T FORGET TO USE “GO” AT THE END OF A COMMAND SEQUENCE YOU WANT TO EXECUTE.
The resulting text should be like this:
id     name                quantity
------ ------------------- --------
     2 orange                   154

(1 rows affected)